


Want to accept Cash App Pay in WordPress?
You don’t need to build a payment integration from scratch. With a reliable payment form plugin, you can connect your payment account, enable Cash App, create a payment form, and test the checkout before accepting live payments.
The setup is simple.
But check one eligibility detail before you begin: Cash App Pay currently supports sellers in the United States, and only buyers in the United States can use Cash App as a payment option.
In this guide, you’ll learn what Cash App Pay is, what you need before setup, how to add it to a WordPress payment form, how to test the checkout, and what to check when Cash App Pay doesn’t appear.
What Is Cash App Pay?
Cash App Pay is a merchant payment method that lets eligible customers pay businesses through Cash App.
Instead of typing card details into your WordPress payment form, the customer authorizes the payment through the Cash App payment flow.
Square handles the payment processing, while WP Easy Pay connects your WordPress payment form to your Square account.
Here’s the distinction that matters:
- Cash App is the consumer financial app customers use.
- Cash App Pay is the merchant payment method customers use during checkout.
So adding Cash App Pay to a WordPress website doesn’t mean adding a Cash App username or asking customers to send money manually.
You’re adding a merchant checkout option that works through the connected Square payment flow.
Cash App vs. Cash App Pay: What’s the Difference?
The names sound similar, but they serve different purposes.
Cash App is the consumer app. Customers use it to manage money and make payments.
Cash App Pay is the merchant-facing payment method that lets eligible customers authorize a payment to a business during checkout.
That difference matters for WordPress payments because Cash App Pay works as part of the merchant checkout flow, not as a manual peer-to-peer Cash App transfer.
It also means you can connect the payment to your normal Square transaction workflow instead of manually checking whether a customer sent money.
How Does Cash App Pay Work With WordPress?
Several pieces work together when someone pays with Cash App Pay on your website.
The basic flow looks like this:
Customer → WordPress payment form → Cash App Pay → Cash App authorization → Square → Business
Here’s what each part does:
- WordPress hosts the page where your customer completes checkout.
- WP Easy Pay creates the payment form and connects WordPress with Square.
- Cash App Pay lets eligible customers authorize the payment.
- Cash App handles the customer’s payment authorization experience.
- Square processes the payment through the connected Square account.
- Your business receives the payment through the normal Square payment flow.
WP Easy Pay connects your WordPress payment form to Square. It doesn’t replace Square as the payment processor.
On supported desktop web flows, Cash App Pay can display a QR code that the customer scans with a mobile device. On supported mobile flows, the customer can continue into the Cash App experience to authorize the payment.
Do You Need WooCommerce to Accept Cash App Pay?
No. You don’t need WooCommerce to accept Cash App Pay on a WordPress website.
A payment form plugin can handle individual payments without requiring a complete ecommerce store.
For example, WP Easy Pay can work for use cases such as:
- Donations
- Membership payments
- Invoice or service payments / Individual product payments
- Recurring payments with supported payment methods
- Subscription payments with supported payment methods
WooCommerce makes more sense when you need a full ecommerce system with products, categories, shopping carts, inventory, shipping, orders, and store management.
If you only need a WordPress payment form, a dedicated payment form plugin can keep the setup much simpler.
A Note About Recurring and Subscription Payments:
WP Easy Pay supports recurring payments and subscription workflows, but not every payment method supports recurring billing.
Cash App Pay doesn’t support subscription payments.
What You Need Before Setting Up Cash App Pay
A little preparation can save you from troubleshooting the checkout later.
You’ll need:
- A WordPress website
- A WP Easy Pay plan that includes Cash App support
- An activated Square account
- An eligible U.S. Square seller location
- Cash App Pay enabled for the applicable Square account
- A WordPress payment form
- A U.S.-eligible buyer environment
- HTTPS on your payment page
- A suitable testing environment
Cash App Pay currently supports sellers based in the United States, and only buyers in the United States can choose Cash App as a payment option.
Which WP Easy Pay Plan Supports Cash App Pay?
WP Easy Pay’s current pricing information lists Cash App under the Business plan.
Before purchasing, check the current WP Easy Pay pricing page and confirm that your selected plan includes Cash App support.
Plan features can change, so don’t rely on an old screenshot or an older blog post when choosing your plan.
How to Set Up Cash App Pay in WordPress
You can complete the setup in three main steps:
- Install and activate WP Easy Pay Pro.
- Connect Square and enable Cash App Pay.
- Create, publish, and test your Cash App Pay payment form.
Let’s get started.
Step 1: Install and Activate WP Easy Pay
First, install the WP Easy Pay version that supports Cash App.
Go to the WP Easy Pay pricing page and choose a plan that includes a Cash App.
After you purchase it, download the WP Easy Pay Premium ZIP file and keep your license key nearby.
Then follow these steps:
- Log in to your WordPress dashboard.
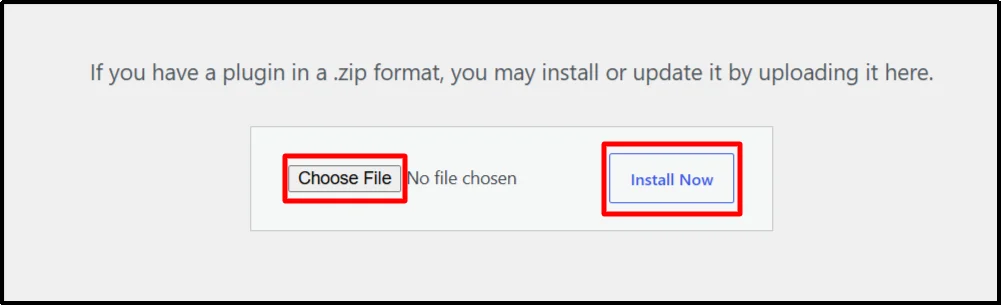
- Go to Plugins → Add Plugin → Upload Plugin.
- Click Choose File and select the WP Easy Pay ZIP file.
- Click Install Now.
- Activate the plugin.
- Enter/Paste your WP Easy Pay license key.
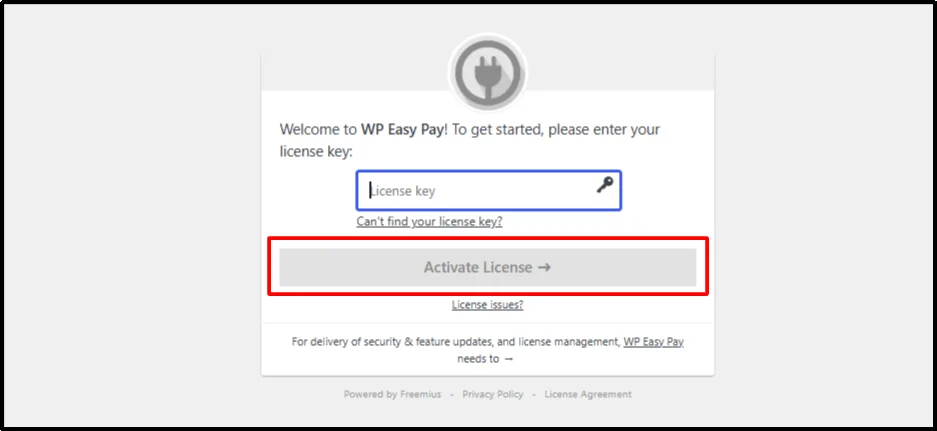
- Click Activate License.
Once the plugin is active, you’re ready to connect Square.
But if Cash App doesn’t appear later, don’t assume the plugin installation failed. Check the plan, Square account, location, and payment-method settings first.
Step 2: Connect Square and Enable Cash App Pay
WP Easy Pay uses Square to process the payments.
Start by connecting your Square account.
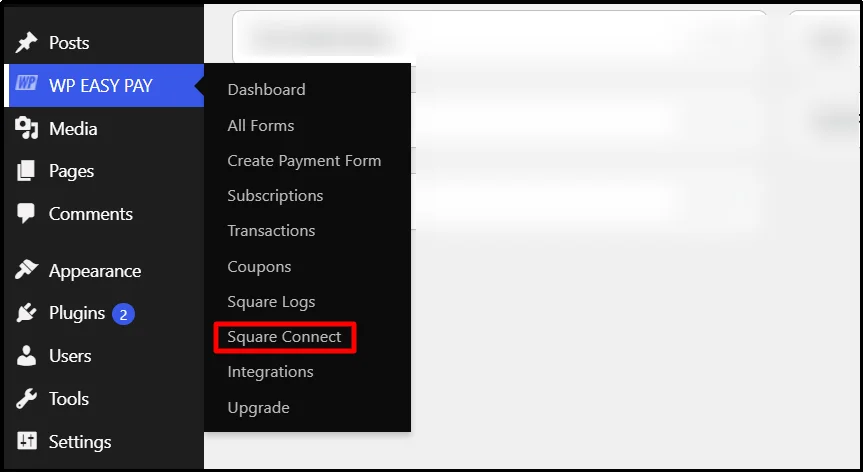
- From your WordPress dashboard, go to WP Easy Pay → Square Connect.
- Choose the environment you want to use.
- Select Sandbox if you’re testing the payment workflow.
- Choose Live Payments when you’re ready to accept real customer payments.
- Click Connect Square.
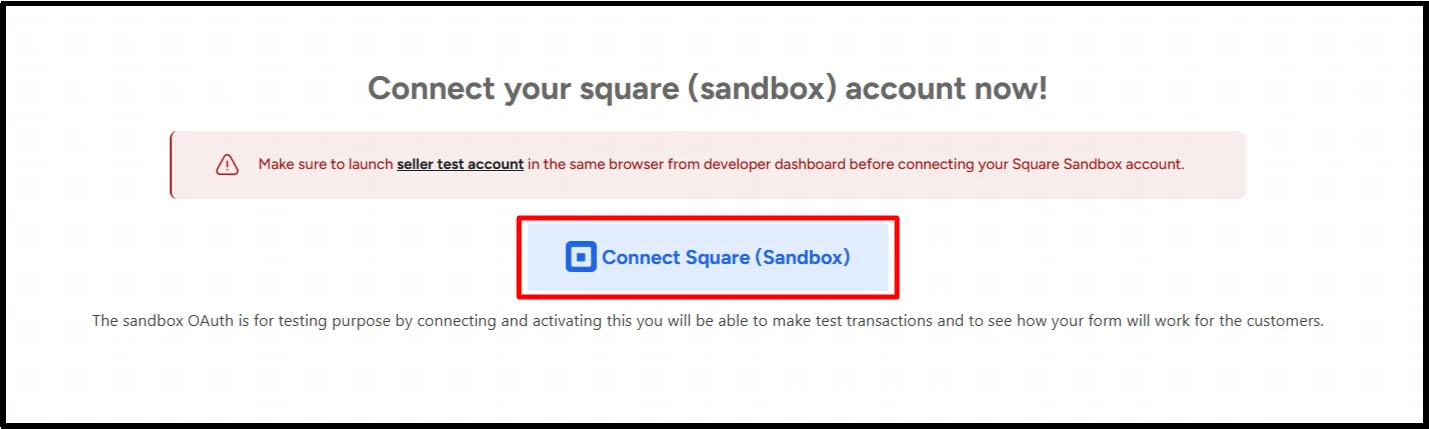
- Sign in to your Square account.
- Authorize the connection when Square asks for permission.
- After authorization, select THAT’S MY SITE – REDIRECT ME.
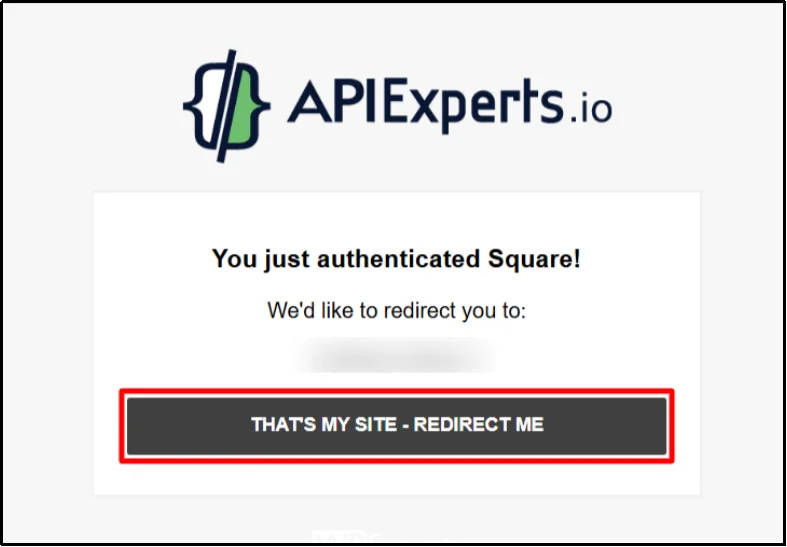
You’ll return to your WordPress dashboard.
Your Square account should now appear as connected in WP Easy Pay.
If you’re testing, keep the connection in Sandbox while you configure and test your payment form.
Enable Cash App Pay in WP Easy Pay
- Go to WP Easy Pay → Square Connect.
- Find the available payment methods.
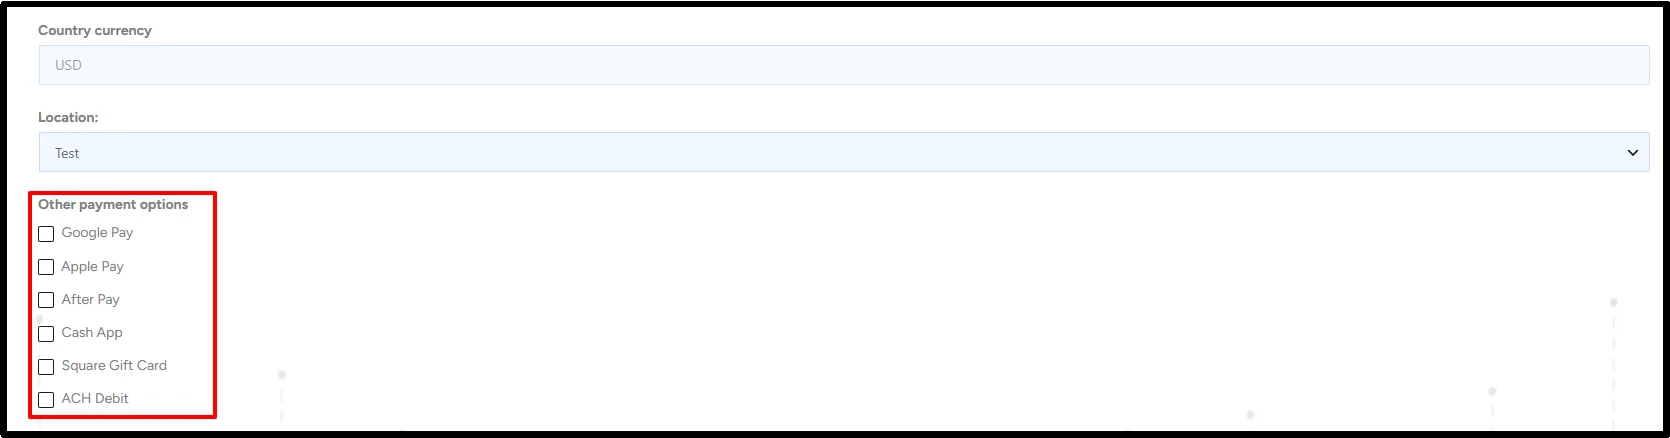
- Select the appropriate Square Location.
- Locate the Cash App option.
- Enable Cash App.
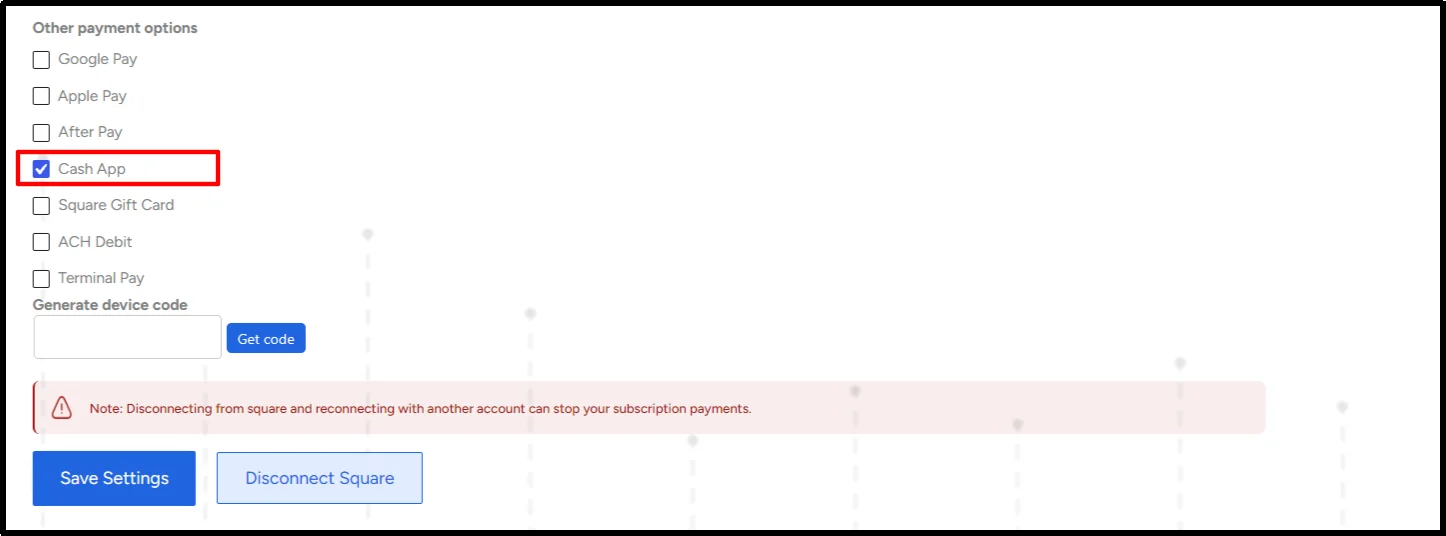
- Enable any other supported payment methods you want to offer.
- Click Save Settings.
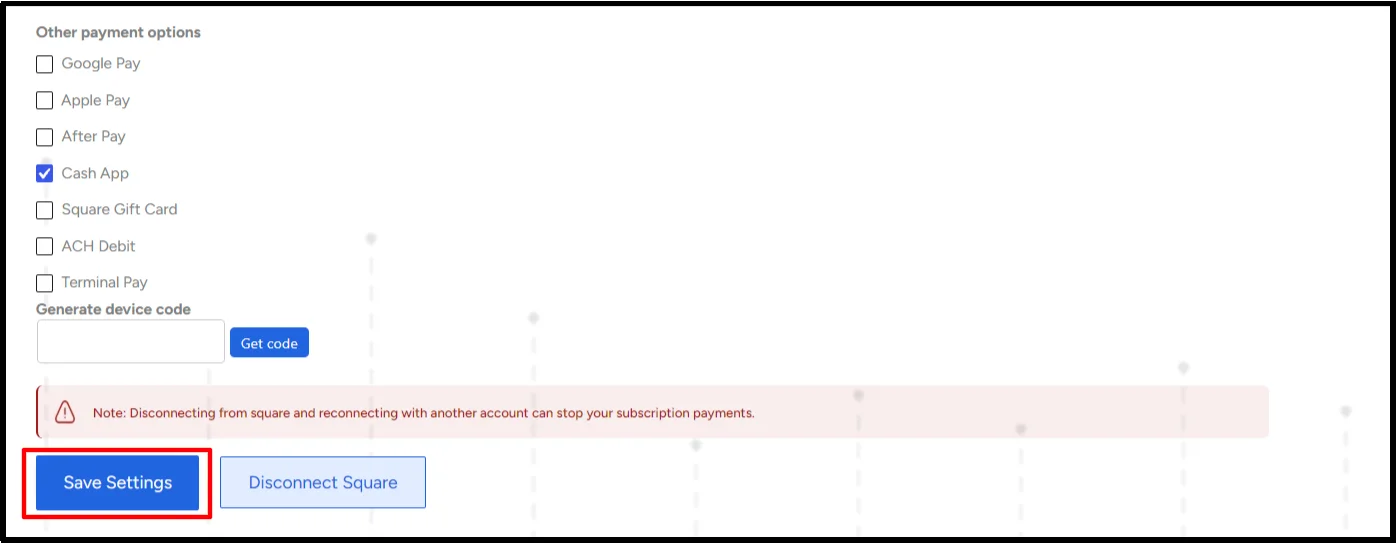
Your Cash App Pay setting is now configured. But the checkout still needs a payment form.
Step 3: Create, Publish, and Test Your Cash App Pay Payment Form
Enabling Cash App Pay doesn’t automatically create a customer facing payment page. You need to create or edit a WP Easy Pay payment form.
Create the Payment Form
- Go to WP Easy Pay → Create Payment Form.
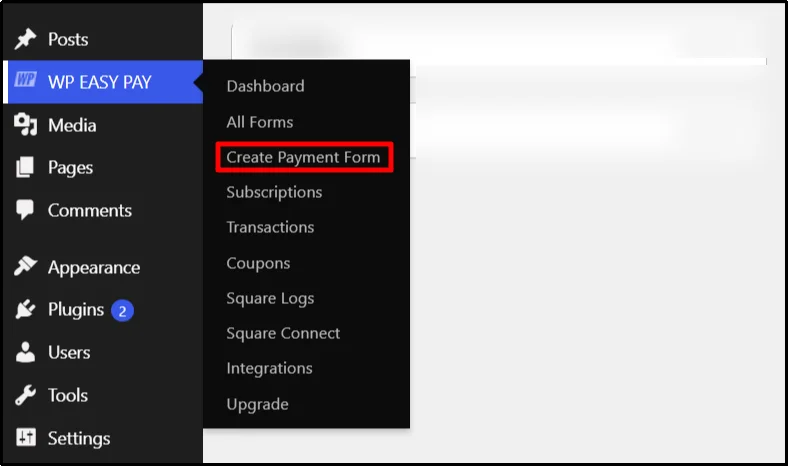
- Add a form title and description.
- Choose the payment type that matches your use case.
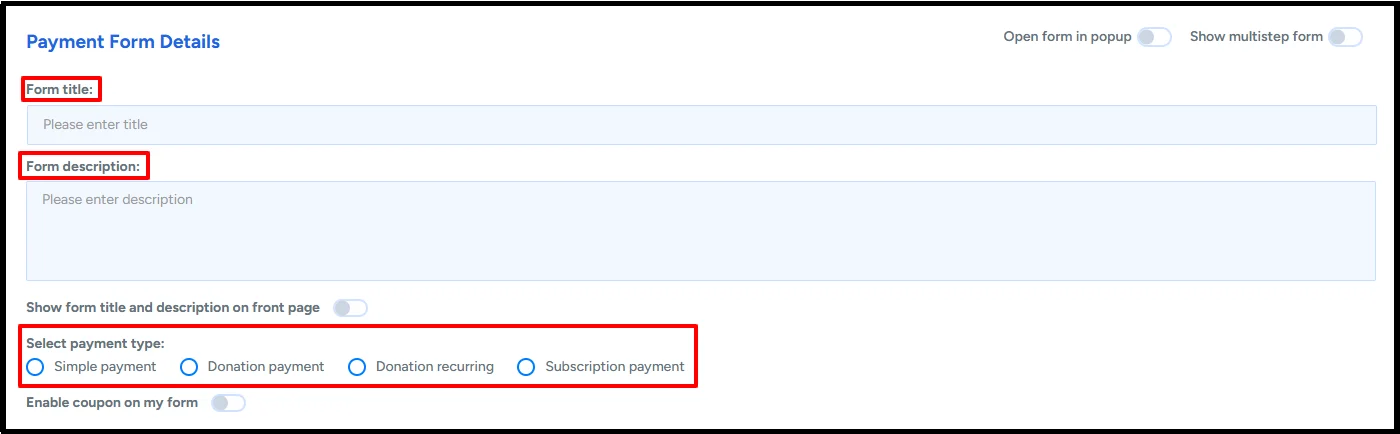
- Enter the payment amount.

- Configure payment notifications and success behavior.
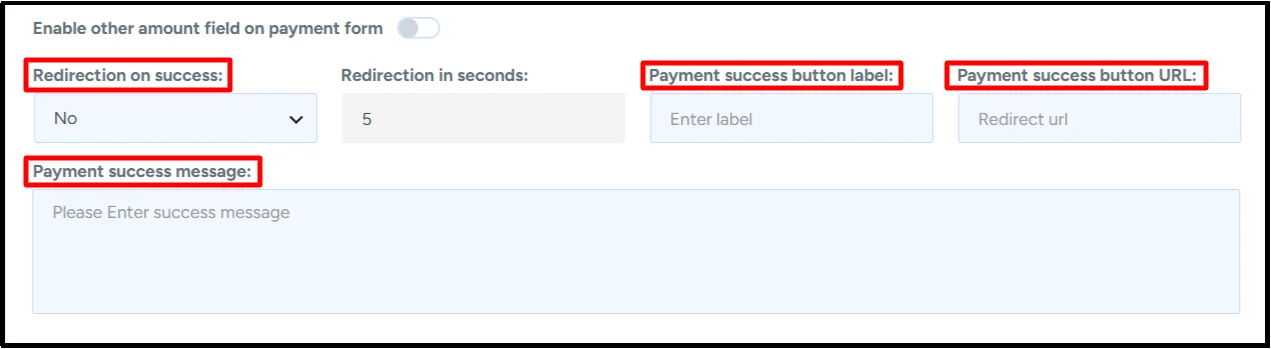
- Review the form.
- Click Publish.
Depending on your WP Easy Pay setup, you can create a WordPress payment form, donation form, recurring donation form, or subscription form.
For the amount, you can use a fixed payment amount when customers need to pay a specific price. Or you can allow a customer-defined amount when customers need to enter their own payment value.
You can also configure payment confirmation emails, a custom success message, or a post-payment redirect.
Remember that Cash App Pay doesn’t support subscription payments, so choose a compatible payment method when you need automatic recurring billing.
Add the Payment Form to a WordPress Page
Now place the form on the page where customers will make their payment.
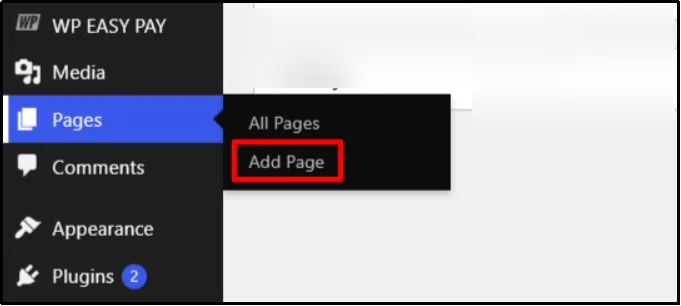
- Go to Pages → Add Page.
- Give the page a useful title.
- Add the WP Easy Pay block.
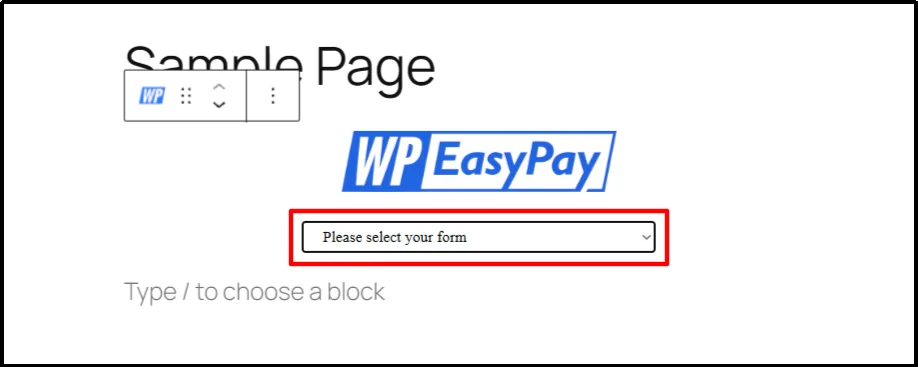
- Select the payment form you created.
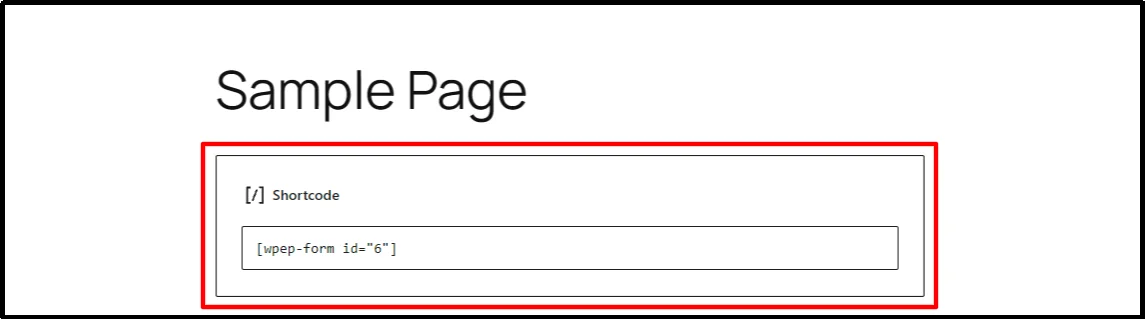
- Alternatively, add the form using its shortcode.
- Click Publish.
- Open the published page and check the checkout.
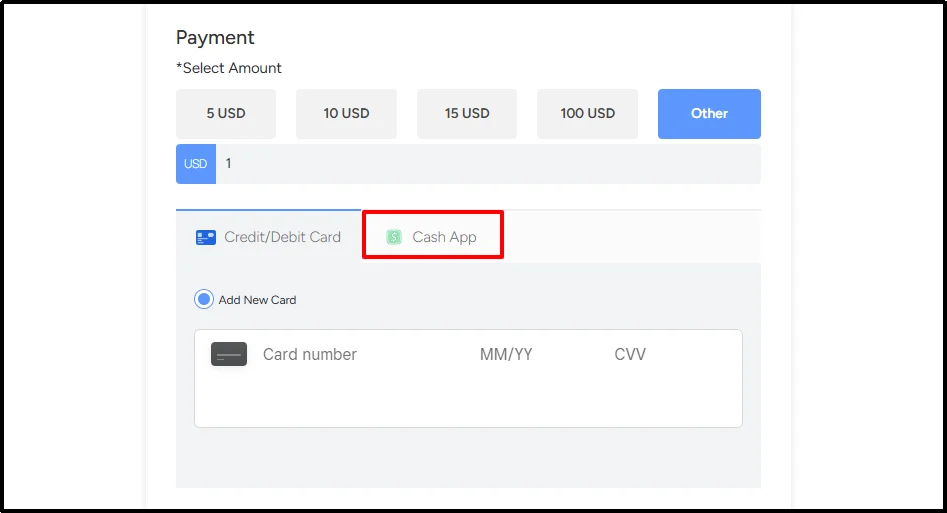
Your Cash App Pay checkout is ready for testing.
How to Test Cash App Pay Before Going Live
Don’t switch straight to Live Payments. Test the complete checkout first.
WP Easy Pay provides a Sandbox workflow for testing payment forms before you accept real payments. The exact Cash App Pay testing experience depends on the connected Square flow.
Start with these checks:
- Keep WP Easy Pay connected to Square Sandbox.
- Open the published WordPress payment form.
- Enter the required form information.
- Select Cash App.
- Click the Cash App Pay button.
- When the QR code appears, use your mobile device to follow the Cash App Pay Sandbox flow shown.
- Review and approve the test transaction.
- Confirm that the form reaches its successful payment state.
- Check the Square Sandbox Dashboard for the transaction.
Never use Sandbox credentials or test results as proof that your live checkout can process real payments.
If you need to test a real production transaction, remember that production payments can charge real payment methods.
How Does Cash App Pay Work on Desktop and Mobile?
The checkout experience can differ depending on the customer’s device.
Desktop
On supported desktop web flows, the customer selects Cash App Pay and receives a QR code.
The customer scans the QR code with a mobile device, follows the Cash App payment flow, reviews the transaction, and authorizes the payment.
The basic experience looks like this:
Desktop → Cash App Pay → QR code → Mobile device → Cash App → Payment authorization
The exact Sandbox and Live behavior can differ, so follow the flow presented by your current WP Easy Pay and Square setup.
Mobile
On a supported mobile experience, the customer can continue into the Cash App experience to authorize the transaction.
The flow looks like this:
Mobile browser → Cash App Pay → Cash App → Payment authorization → Merchant website
The customer reviews the payment before approving it.
So the customer experience isn’t identical across desktop and mobile, and that’s expected for Cash App Pay.
Cash App Pay Not Showing in WordPress? Try These Fixes
If Cash App Pay doesn’t appear on your WordPress payment form, don’t reinstall everything immediately.
Start with the basics.
1. Check Your Square Location
Cash App Pay currently supports sellers based in the United States, and only buyers in the United States can use Cash App as a payment option.
Check the Square location connected to WP Easy Pay.
If the seller location isn’t eligible, Cash App Pay won’t appear in the checkout.
2. Verify Cash App Pay Settings
Check both sides of the integration.
First, confirm that the Cash App is available and enabled in your Square account. Then go to WP Easy Pay → Square Connect and verify that Cash App is enabled for the correct Square location.
3. Check Your Square Account Status
A successful connection doesn’t automatically mean your account can process live payments.
Make sure your Square account is activated and eligible to accept payments.
If you’ve recently changed Square accounts, locations, or payment settings, reconnect the correct account to WP Easy Pay and check the selected location again.
4. Check Sandbox vs. Live Mode
Your testing environment and payment connection need to match.
If you’re testing, use the Square Sandbox environment. If you’re accepting real payments, use the production connection.
Mixing the two can create confusing results.
5. Check the Payment Form
Make sure you’ve actually published the WP Easy Pay payment form.
Open the published page in a private or incognito browser window and check whether the form loads correctly.
If the form itself doesn’t load, fix that problem before troubleshooting the Cash App.
6. Clear Your WordPress and CDN Cache
Caching can leave you looking at an older version of your checkout.
Clear your WordPress cache and CDN cache if you use one.
Then reload the payment page.
7. Check JavaScript Optimization
Payment forms rely on JavaScript.
Caching and optimization plugins can sometimes modify, delay, combine, or defer scripts that the checkout needs.
If you’ve enabled JavaScript minification, combination, or deferred loading, temporarily disable those settings and test the checkout again.
8. Check for Plugin or Theme Conflicts
Another plugin or your WordPress theme can interfere with the payment form.
Temporarily disable nonessential plugins and test again.
If Cash App returns, enable the plugins one at a time until you find the conflict.
Can You Accept Cash App Pay Alongside Other Payment Methods?
Yes, when your WP Easy Pay and Square configuration supports the payment methods you want to offer.
You can configure Cash App Pay alongside other supported methods, including:
- Credit and debit cards
- Google Pay
- Apple Pay
- ACH Debit
- Afterpay
- Other payment methods supported by WP Easy Pay
This gives customers more ways to complete a payment without forcing you to create a separate checkout page for every payment method.
But availability can depend on your Square account, location, WP Easy Pay plan, and the specific payment method.
Start Accepting Cash App Pay With WP Easy Pay
Adding Cash App Pay to WordPress doesn’t require you to build a payment system from the ground up.
With WP Easy Pay, you can connect your WordPress website to Square, enable supported payment methods, create payment forms, and test your checkout before accepting real payments.
But check the eligibility requirements first.
Cash App Pay currently supports sellers based in the United States, and only buyers in the United States can use Cash App as a payment option.
Ready to add Cash App Pay to your WordPress website?
Get WP Easy Pay and start creating Square-powered WordPress payment forms with Cash App Pay and other supported payment methods.
Frequently Asked Questions
Can I Add a Cash App to My WordPress Website?
Yes. You can add Cash App Pay to a WordPress website through a compatible payment form plugin such as WP Easy Pay, which connects your payment form with Square.
Is Cash App Pay Available for WordPress?
Yes. WordPress doesn’t process Cash App Pay directly, but a compatible payment integration can connect your WordPress payment form with Square and enable Cash App Pay for eligible U.S. sellers and buyers.
Do I Need a Square Account to Use Cash App Pay With WP Easy Pay?
Yes. WP Easy Pay uses Square for this payment integration, so you’ll need a compatible Square account and an eligible Square location.
Is Cash App Pay Available Outside the United States?
No. Square’s current documentation states that Cash App Pay supports sellers based in the United States, and only buyers in the United States can choose Cash App as a payment option.
Can I Accept Cash App Pay and Credit Cards Together?
Yes, provided your WP Easy Pay and Square setup supports both payment methods.
You can enable multiple supported payment methods and let customers choose the option they prefer.
Can Customers Pay With Cash Apps From a Desktop Computer?
Yes. On supported desktop web flows, Cash App Pay can display a QR code that the customer scans with a mobile device.
The customer then continues through the Cash App payment flow to authorize the transaction.