


Google Pay gives customers a convenient way to pay without manually entering their card details at checkout.
And you don’t need to build a payment system from scratch to add Google Pay to WordPress. With Square connected to WP Easy Pay, you can create a WordPress payment form and offer Google Pay alongside other supported payment methods.
The setup is straightforward.
In this guide, you’ll learn what you need before getting started, how Google Pay works with WordPress, how to add Google Pay with WP Easy Pay and Square, how to test the checkout, and what to check when the Google Pay button doesn’t appear.
What Is Google Pay?
Google Pay is a digital wallet that lets customers use eligible payment methods associated with their Google Account to complete supported online payments.
Instead of typing card information into every checkout form, customers can select Google Pay and follow the authentication steps shown by their device or browser.
Your WordPress site hosts the payment page. WP Easy Pay creates the payment form and connects it to Square, while Google Pay provides the customer’s digital wallet payment experience.
How Does Google Pay Work With WordPress?
The process looks simple from the customer’s perspective, but several services work together behind the scenes.
Customer → WordPress payment form → Google Pay → WP Easy Pay → Square
Here’s what each part does:
- Google Pay: Provides the customer’s digital wallet payment experience.
- WP Easy Pay: Creates the payment form and connects your WordPress site to Square.
- Square: Processes the payment through your connected merchant account.
- WordPress: Hosts the payment page and displays the form to your customers.
So when a customer chooses Google Pay, WordPress doesn’t process the money itself. WP Easy Pay passes the payment request through the connected Square integration, while Google Pay handles the customer’s wallet experience.
Why Add Google Pay to WordPress?
Customers don’t always want to type their card information into a checkout form.
Offering a digital wallet can give eligible customers a more convenient payment option.
1. Faster checkout
Customers can use eligible payment information already associated with Google Pay instead of manually entering every payment detail.
2. Less manual data entry
A wallet-based checkout can reduce the amount of information customers need to enter before completing a payment.
3. More payment choice
You can offer Google Pay alongside credit and debit cards and other payment methods supported by your payment integration.
4. Convenient mobile payments
Google Pay can provide another payment option for customers using supported devices, browsers, and configurations.
But don’t treat Google Pay as a replacement for every other payment method.
Giving customers multiple supported ways to pay lets them choose the option that fits their device and preferences.
What You Need Before Setting Up Google Pay
Before you start configuring Google Pay, check the basic requirements for your WordPress site and payment setup.
You’ll typically need:
- A working WordPress website with HTTPS/SSL enabled
- A supported payment processor, such as Square
- A WordPress payment form plugin or integration that supports Google Pay
- A supported country or region
- A Google Account and eligible payment method for testing
Your exact requirements can vary depending on the payment processor and integration.
For example, your payment integration may also require additional account, domain, or merchant configuration before Google Pay appears on the payment form.
How to Add Google Pay in WordPress With WP Easy Pay
You can enable Google Pay through the WP Easy Pay and Square payment setup.
The setup has four main steps: install WP Easy Pay, connect Square, enable Google Pay, and create your payment form. You’ll then test the complete checkout before accepting live payments.
Step 1: Install and Activate WP Easy Pay Pro
The first thing to do is install WP Easy Pay Pro on your WordPress website.
If you want to offer Google Pay along with other premium payment methods, visit the current WP Easy Pay pricing page and select the plan that provides the features you need.
Before you continue: If you already have the WP Easy Pay Free version, deactivate it and use the following installation instructions.
Go to the WP Easy Pay pricing page and purchase the Professional or Business plan.
After completing your purchase, you’ll receive the WP Easy Pay Pro ZIP file and your license information.
Keep the license key available because you’ll need it during activation.
Now, log in to your WordPress dashboard.
- Go to Plugins → Add Plugin → Upload Plugin.
- Click Choose File and select the WP Easy Pay ZIP file you received after purchase.
- Click Install Now.
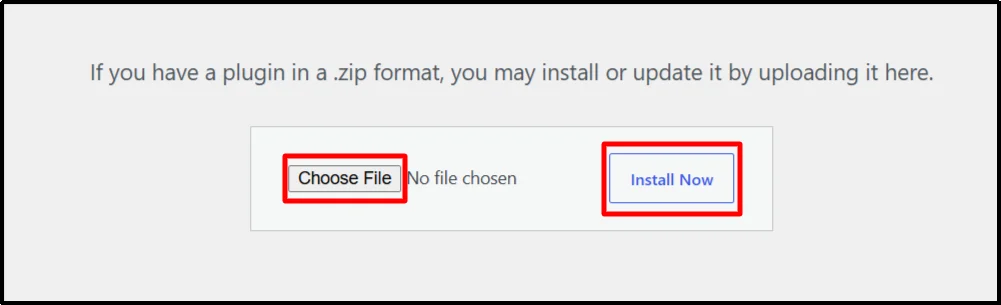
- After WordPress finishes the installation, click Activate.
- When WP Easy Pay asks for your license key, enter it in the provided field.
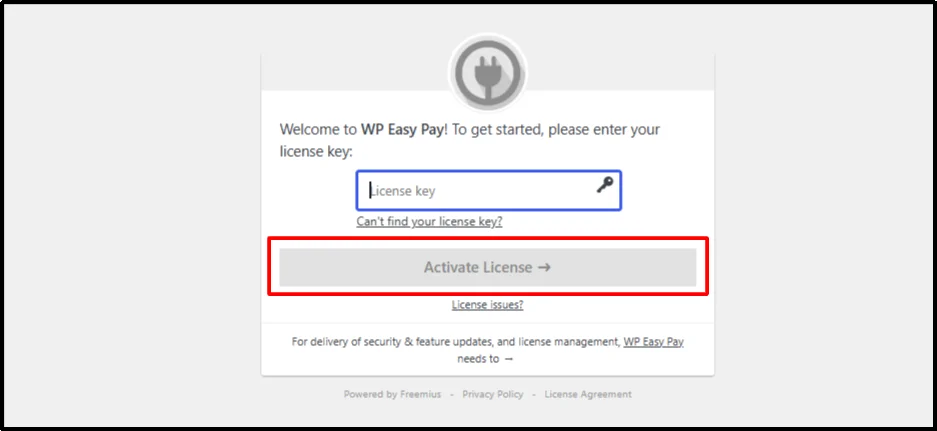
- Select Activate License.
Once you’ve activated WP Easy Pay, the next step is connecting your Square account.
Step 2: Connect WP Easy Pay to Square
WP Easy Pay connects with Square to process your online payments, so you’ll need to link your Square account before you configure Google Pay.
- From your WordPress dashboard, go to WP Easy Pay → Square Connect.
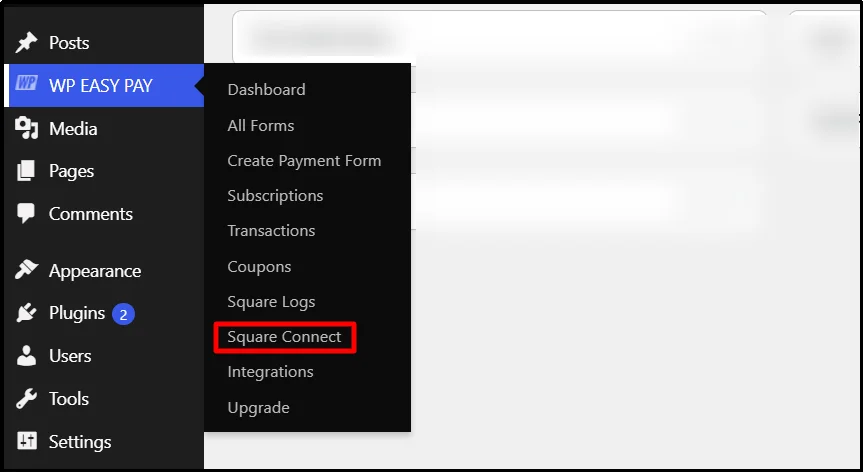
- You’ll see options for connecting to Square and choosing your payment environment.
Select Sandbox if you’re setting up and testing Google Pay before accepting real payments.
Choose Live Payments when you’re ready to process actual customer transactions.
- Click Connect Square.
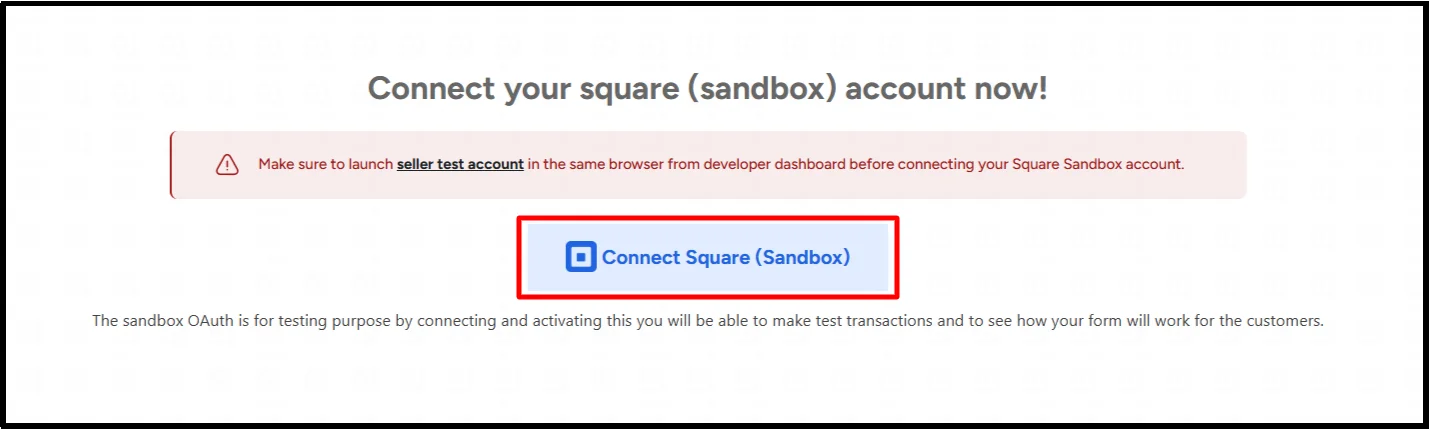
- Sign in to your Square account when the authorization screen appears.
- Review the requested permissions and authorize the connection.
- Once Square completes the authorization, click THAT’S MY SITE – REDIRECT ME to return to your WordPress dashboard.
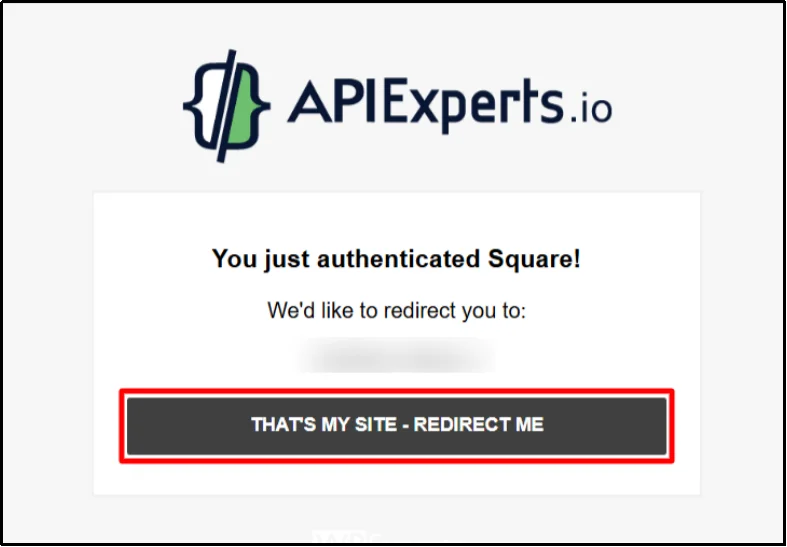
If you’re testing the setup, keep your account in Sandbox mode while you work through the payment form.
That gives you a safer place to check the entire checkout flow before customers use it.
Step 3: Enable Google Pay
With Square connected, you can now enable Google Pay in your WP Easy Pay settings.
Important: Google Pay testing is different from testing a standard card field. For Google Pay testing in Square Sandbox, use an eligible real card registered with Google Pay. Do not enter Square Sandbox test-card numbers into the Google Pay wallet.
- Return to WP Easy Pay → Square Connect.
- Look for the available payment methods in your Square connection settings.
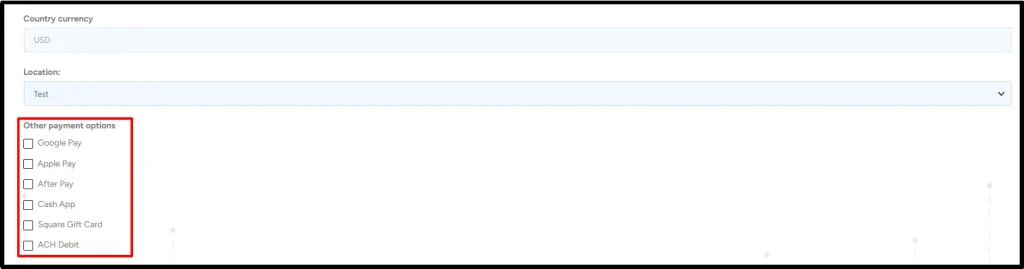
- Select Google Pay.
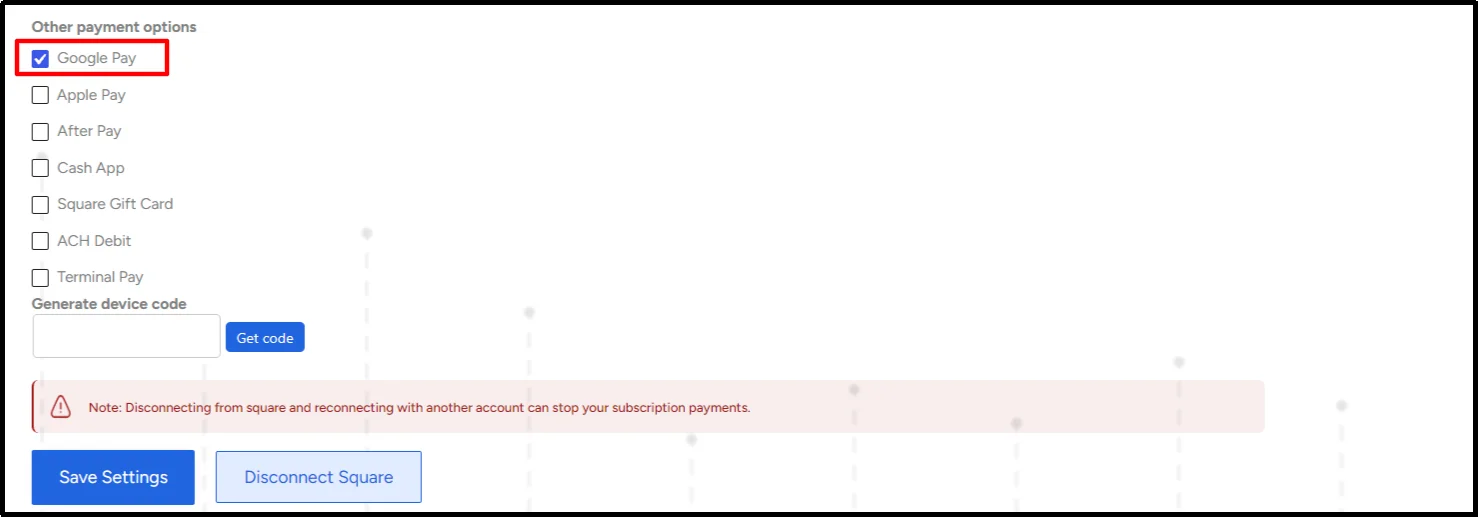
- Review the available Google Pay configuration options and complete any additional setup that WP Easy Pay or Square requires for your account.
- Save your settings.
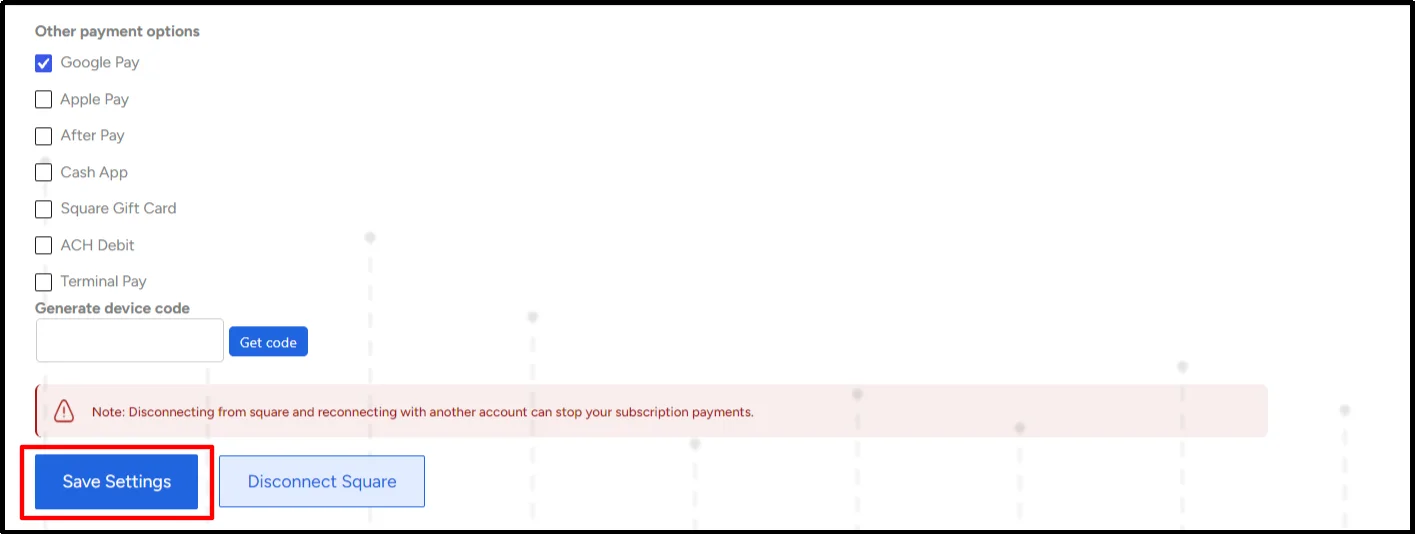
Google Pay is now enabled in your WP Easy Pay payment settings. Next, create your payment form and test the checkout.
Before you move on, make sure your payment domain uses HTTPS and that your Square account, location, country, and currency meet the requirements for your payment setup.
If your integration prompts you to complete any additional Google Pay or domain configuration, finish those steps before testing.
Step 4: Create and Publish Your WordPress Payment Form
Now create a WP Easy Pay payment form where customers can choose Google Pay.
You can create a new form or add Google Pay to an existing payment form.
- Go to WP Easy Pay → Create Payment Form.
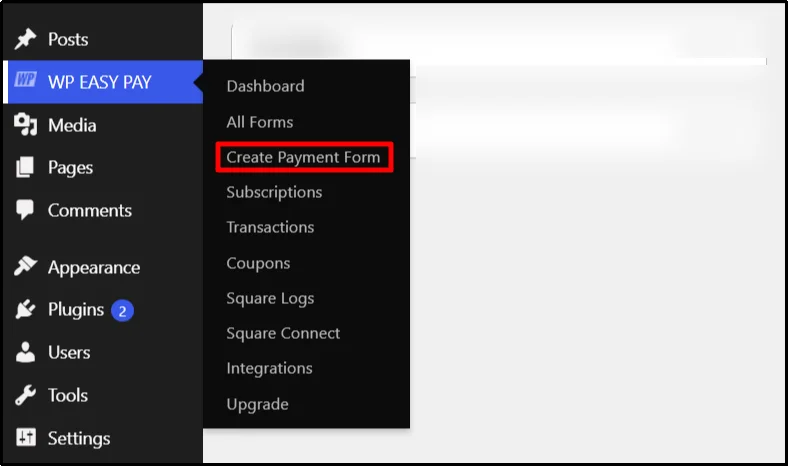
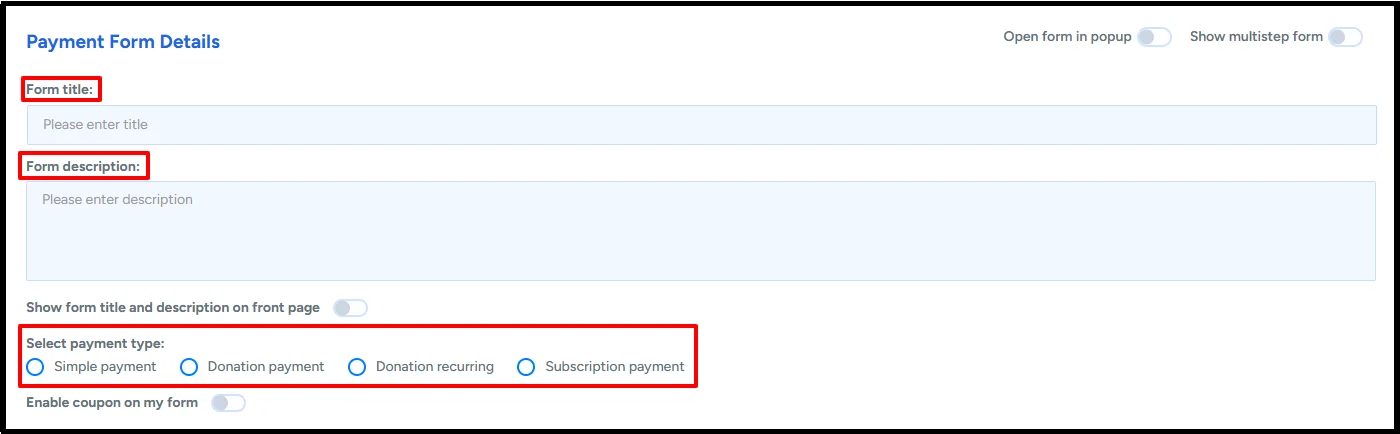
- Enter your form title and description.
- Choose the payment type that matches your purpose, such as a simple payment, donation, recurring donation, or subscription.
Read our guide on: how to create a recurring donation form.
- Set the payment amount and add the customer fields you need.

- Configure any other transaction details, confirmation messages, or email notifications required for your payment workflow.
- If you want to send customers to a specific page after a successful transaction, configure Redirection on Success. You can also create a custom success message for customers who complete their payment.
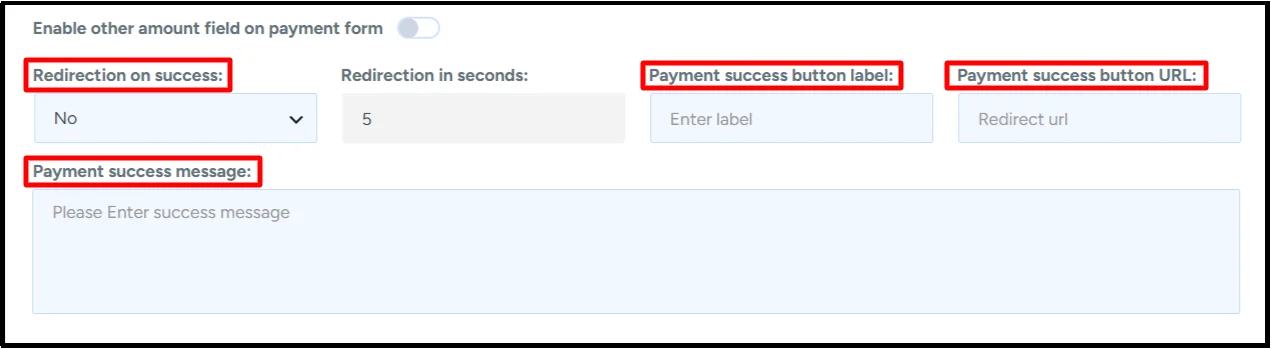
- Review the form settings, then click Publish.
If you want to place the form using a shortcode, copy the form shortcode after publishing.
WP Easy Pay also supports block-based embedding, so you can insert the payment form directly through the WordPress editor.
Create a Dedicated Google Pay Payment Page
If you want customers to access the form from a dedicated payment page, follow the steps below:
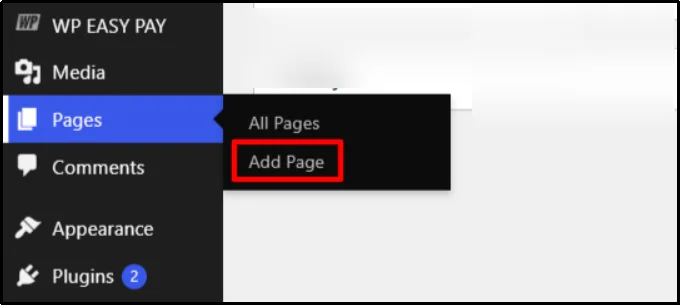
- Go to: Pages → Add Page.
- Enter a suitable page title, such as Pay Your Invoice.
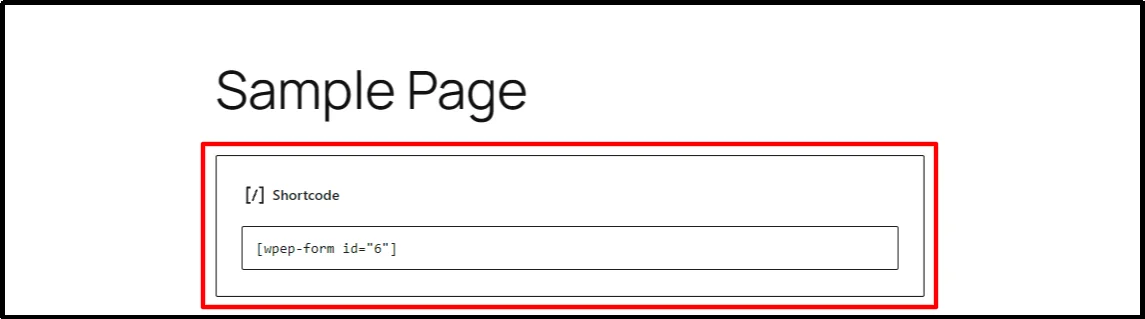
- Add the WP Easy Pay block to the page, or paste the payment form shortcode into the editor.
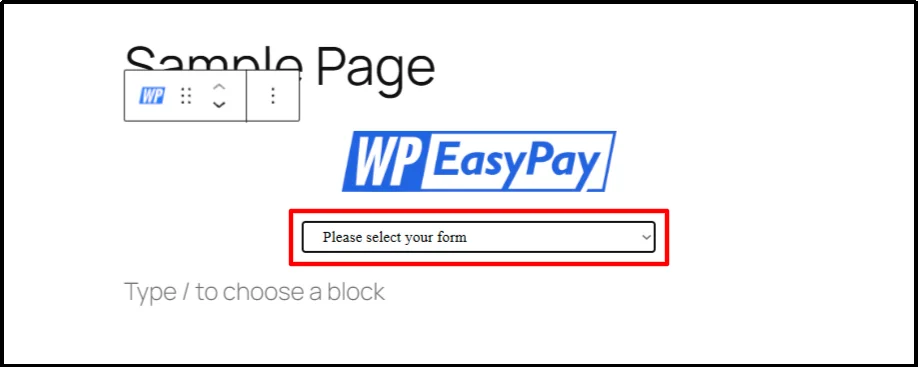
- If you choose the WP Easy Pay block, select the payment form you created earlier.
- Click Publish.
Open the published page and review the payment form in your test environment.
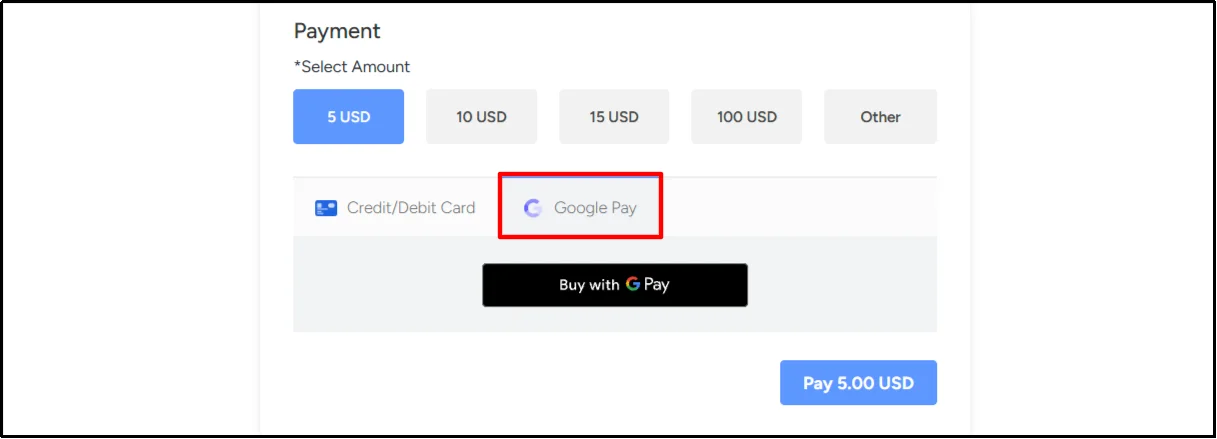
Don’t send the page to customers yet. Test the complete Google Pay checkout first.
How to Test Google Pay on WordPress
Testing gives you a chance to catch configuration problems before customers encounter them.
If your setup supports Square Sandbox testing, start there.
1. Connect your Square Sandbox
Use the sandbox environment for your initial tests rather than immediately processing live payments.
2. Open your payment form
Visit the WordPress page containing your WP Easy Pay payment form.
3. Use a compatible device and browser
Test the checkout using a device and browser that support Google Pay for your particular integration.
4. Check whether Google Pay appears
Look at the available payment methods and confirm that Google Pay appears when the test conditions support it.
If the button doesn’t appear, don’t assume the plugin has failed. Device, browser, account, payment method, region, currency, and integration requirements can affect availability.
5. Complete a test payment
Click the Google Pay button and complete the Google Pay payment flow using the eligible card registered with your Google Pay account. In Square Sandbox, the card isn’t charged.
6. Check your Square account
Open the connected Square account and verify that the test transaction appears correctly.
7. Check the payment confirmation
Confirm that your payment form displays the expected success message after the transaction.
8. Check customer notifications
If you’ve configured email notifications, verify that the expected payment confirmation reaches the customer.
9. Test an unsuccessful scenario
Where your test environment supports it, test an unsuccessful payment or validation error as well.
You want to know what happens when the payment doesn’t go through—not just when everything works.
10. Switch to live mode
Before switching to Live Payments, make sure your Square account has completed activation and that WP Easy Pay uses the correct production connection and business location. Sandbox credentials won’t process real customer payments.
For a detailed look at testing payments: How to Test Square Payments Before Accepting on WordPress.
Google Pay Not Showing on WordPress? Here’s How to Fix It
Sometimes Google Pay won’t appear even after you enable it.
The problem doesn’t always originate in WordPress. Several parts of the payment environment can affect whether the option appears.
1. Verify Your Google Pay Settings on WP Easy Pay
This might not sound like a serious issue, but people often forget to save the Google Pay settings as the other available payment method.
2. Check your browser and device
First, verify that your browser supports Google Pay for the integration you’re using.
Test the payment form on another compatible device.
If Google Pay appears on one device but not another, the issue may relate to device, browser, account, or wallet availability rather than your WordPress configuration.
3. Check your Google Account and payment method
Make sure you’re signed into the appropriate Google Account and have an eligible payment method available for testing.
4. Check HTTPS and security headers
Your payment page should use HTTPS.
If your website still serves the checkout through HTTP, fix the SSL configuration before troubleshooting the payment button further.
5. Check Google Pay settings
Return to your WP Easy Pay payment settings and make sure Google Pay remains enabled.
A configuration change or account connection update can affect available payment methods.
6. Check your Square connection
Open WP Easy Pay → Square Connect and verify that your Square account remains connected.
Also check that you’ve connected the intended Square location or account.
7. Check test and live mode
Make sure you know whether your WordPress site currently connects to Square Sandbox or the production environment.
Don’t mix sandbox testing with assumptions about live availability.
8. Check country and currency
Google Pay availability can depend on the country, payment method, currency, merchant account, and payment processor configuration.
Review the requirements for your specific setup.
9. Clear caching
Caching plugins and content delivery networks can sometimes interfere with dynamic checkout elements.
Clear your WordPress cache and CDN cache, then test the payment form again.
10. Check JavaScript conflicts
Payment buttons rely on browser-side scripts.
If another plugin, theme script, optimization tool, or security feature interferes with those scripts, Google Pay may fail to load correctly.
Temporarily test the form with unnecessary optimization or script-modification features disabled.
11. Test for plugin conflicts
If the problem continues, temporarily disable nonessential plugins and test the payment form again.
Pay particular attention to caching, checkout customization, JavaScript optimization, and security plugins.
Does Google Pay Charge Additional Fees?
Google Pay itself doesn’t typically add a separate merchant fee simply because a customer chooses Google Pay.
However, that doesn’t mean the transaction costs nothing.
Your payment processor can charge its standard processing fees, while currency conversion or other account-specific charges may also apply depending on your setup.
Check your payment processor’s current pricing before you publish your payment form.
The important distinction is simple:
Google Pay is the payment method. Your payment processor handles the transaction.
Those aren’t the same thing.
Can You Accept Google Pay and Other Payment Methods Together?
Yes, when your payment integration supports multiple payment methods, you can offer Google Pay alongside other options.
For example, your WordPress payment form may offer Google Pay together with credit or debit cards and other payment methods available through your connected payment processor and WP Easy Pay configuration.
That gives customers more choice without requiring you to create a separate payment page for every method.
With WP Easy Pay, you can build your payment form around the methods that fit your business and the options supported by your Square setup.
Google Pay vs. Traditional Card Payments
Both options can process online payments, but the checkout experience differs.
| Feature | Google Pay | Traditional Card Entry |
| Manual card entry | Usually reduced | Usually required |
| Digital wallet | Yes | No |
| Card details typed into checkout | Typically less | Typically more |
| Mobile convenience | Strong for supported setups | Depends on checkout |
| Customer choice | Requires Google Pay availability | Broad card support |
| Payment processor | Required | Required |
| WordPress integration | Required | Required |
Google Pay doesn’t eliminate traditional card payments. It gives eligible customers another way to complete checkout.
If you want to integrate cards into your WordPress store, you must check out our guide on how to accept credit card payments.
Start Accepting Google Pay on WordPress
You don’t need to turn your WordPress website into a full ecommerce store just to accept digital-wallet payments.
With a compatible Square integration, WP Easy Pay lets you create payment forms for simple payments, donations, subscriptions, and other payment use cases while giving customers supported payment options such as Google Pay.
And you can keep other payment methods available instead of forcing every customer into one checkout option.
So if you want a simpler way to collect payments from WordPress, WP Easy Pay gives you the tools to connect Square, create your payment form, configure supported payment methods, and test the complete checkout before you go live.
Choose the WP Easy Pay plan that fits your website and start creating WordPress payment forms that accept Google Pay today.
Frequently Asked Questions
Can I add Google Pay to WordPress without WooCommerce?
Yes. You don’t need WooCommerce if you use a compatible WordPress payment integration that supports Google Pay. WP Easy Pay can provide a payment-form approach through its Square integration.
Can I use Google Pay with Square on WordPress?
Yes, a compatible WordPress integration can connect Google Pay with Square as part of the payment flow. WP Easy Pay provides a Square-based payment integration for WordPress.
Is Google Pay free for merchants?
Google Pay does not necessarily add a separate merchant fee, but payment processing fees can still apply. Check Square’s current pricing and your account terms before publishing your payment form.
Is Google Pay secure?
Google Pay uses security technologies designed to protect payment information during transactions. Your WordPress site should still use HTTPS, an up-to-date payment integration, and a trusted payment processor. Test the complete payment flow before accepting live transactions.
Why isn’t Google Pay showing on my WordPress payment form?
Check your device, browser, Google Account, payment method, HTTPS configuration, payment processor connection, Google Pay settings, country, currency, and test/live environment. Caching and JavaScript conflicts can also affect dynamic payment elements.
Does Google Pay work on desktop?
Google Pay availability on desktop depends on the browser, device, payment integration, and current Google Pay requirements. Test your exact checkout environment rather than assuming every desktop configuration will display the payment option.
Does Google Pay work on iPhone?
Google Pay availability on iPhone can vary by the browser, region, account, payment method, and payment integration. For a WordPress site using WP Easy Pay and Square, test the actual payment form on the devices and browsers you plan to support.
Can I accept Google Pay and credit cards together?
Yes, if your payment integration and processor support both methods. Offering multiple payment methods can let customers choose the checkout option that works for them.
Can I accept Google Pay for donations?
Yes, if your payment integration supports Google Pay for the donation form and transaction configuration. With WP Easy Pay, you can create donation payment forms through its supported Square integration.