



Apple Pay gives customers a faster way to pay online without manually entering their card details.
Eligible customers can authorize a payment using a card stored in Apple Wallet on a supported device and in a supported browser. WordPress doesn’t process Apple Pay payments itself; your site needs a compatible payment plugin and payment processor to handle the transaction.
You don’t need WooCommerce just to accept Apple Pay. A WordPress payment form plugin can connect your site to a supported processor and display Apple Pay alongside other payment methods.
In this guide, you’ll learn how Apple Pay works with WordPress, what you need before setup, and how to add Apple Pay to WordPress using WP Easy Pay.
TL;DR: The easiest way to accept Apple Pay on a WordPress site is to use a payment form plugin that supports Apple Pay through a compatible payment processor. WP Easy Pay connects WordPress payment forms with Square and supports Apple Pay.
Can You Accept Apple Pay on WordPress?
Yes. You can accept Apple Pay on a WordPress website without WooCommerce.
WordPress displays your payment form, while your payment plugin connects the form to a payment processor such as Square. The processor handles the payment after the customer authorizes it through Apple Pay.
Apple Pay works as a digital wallet payment method within that payment flow. The exact requirements depend on the payment processor, payment plugin, country, device, browser, and account configuration.
How Does Apple Pay Work With WordPress?
Think of the setup as several connected parts rather than a built-in WordPress feature.
Customer → WordPress payment form → Apple Pay payment sheet → payment integration → payment processor → settlement
Here’s what each part does:
- WordPress: Hosts your website, payment page, product page, service page, or donation form.
- Payment form plugin: Connects WordPress to your payment processor and controls the payment form.
- Apple Pay: Provides the digital wallet and payment authorization experience for eligible customers.
- Payment processor: Handles payment authorization, processing, and settlement according to its services and rules.
- Square account: Connects your payment form to Square’s payment-processing infrastructure.
Apple Pay gives customers another way to authorize a payment. The payment processor still handles the transaction after the customer approves it.
Adding Apple Pay to WordPress doesn’t mean you can skip payment processing.
What You Need Before Adding Apple Pay to WordPress
Before you open your WordPress dashboard, check these requirements.
1. A WordPress Website
You’ll need an active WordPress website where you can install and configure a compatible payment plugin.
2. HTTPS
Your payment page must use HTTPS.
Square’s Web Payments SDK requires secure contexts, and its Apple Pay integration doesn’t support HTTP or localhost for Apple Pay payments.
3. A Supported Payment Processor
For this tutorial, you’ll use Square.
Square supports Apple Pay through its Web Payments SDK, along with other payment methods such as cards, Google Pay, ACH, Cash App Pay, and Afterpay/Clearpay. Availability can vary by market and integration.
4. A Compatible WordPress Payment Plugin
You’ll need a payment plugin that supports both Square and Apple Pay.
WP Easy Pay connects WordPress payment forms with Square and supports Apple Pay, Google Pay, Cash App Pay, ACH Debit, and Afterpay.
5. Apple Wallet With an Eligible Payment Card
Your test device needs an eligible payment card in Apple Wallet.
Apple Pay availability can depend on whether the device supports Apple Pay and whether a qualifying payment credential exists in Wallet.
6. A Supported Country and Payment Configuration
Your Square account and payment setup must support the payment method you want to use.
How to Add Apple Pay to WordPress in 4 Steps
You can add Apple Pay without building the integration from scratch.
The process is straightforward.
You’ll connect WP Easy Pay to Square, enable Apple Pay, verify your domain, create a payment form, and test the complete payment flow before accepting live payments.
Step 1: Install and Activate WP Easy Pay
Start by installing WP Easy Pay on your WordPress website.
If you need Apple Pay and other premium payment methods, check the current WP Easy Pay pricing page and choose a plan that includes the features you need.
Before you continue: If you’re upgrading from another WP Easy Pay version, follow the installation instructions for your current version rather than relying on an older plugin installation workflow.
Go to the WP Easy Pay pricing page and purchase the appropriate plan (Professional or Business).
After your purchase, you’ll receive the WP Easy Pay Pro ZIP file and license information.
Keep your license key handy.
- Log in to your WordPress dashboard.
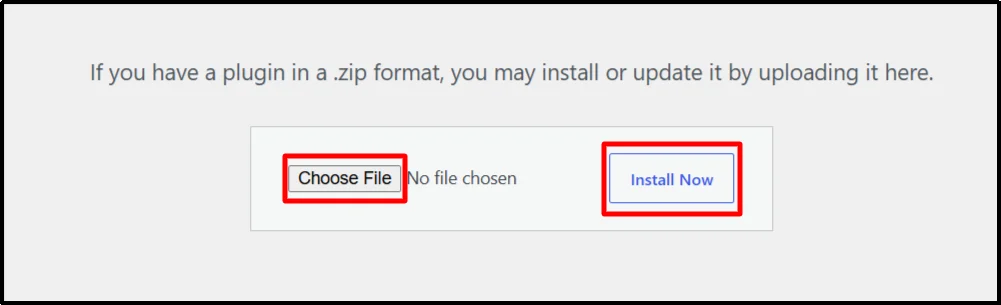
- Go to Plugins → Add Plugin → Upload Plugin.
- Click Choose File and upload the WP Easy Pay ZIP file.
- Click Install Now, then Activate.
- Enter your WP Easy Pay license key when prompted.
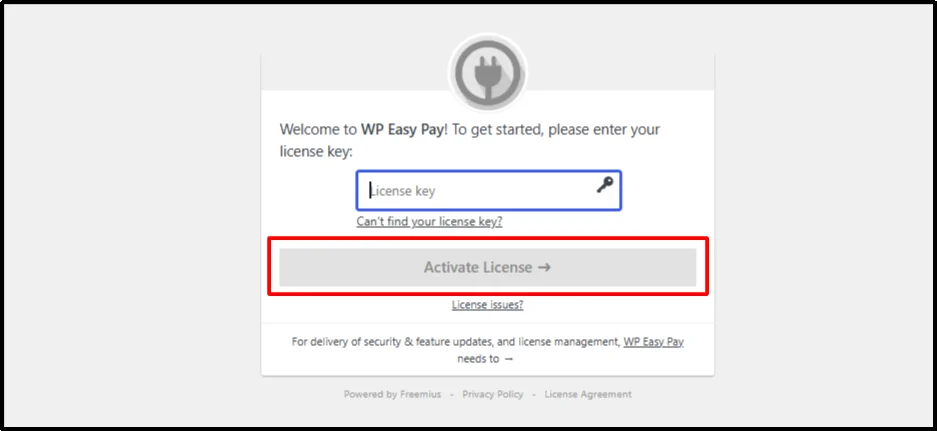
- Select Activate License.
Once WP Easy Pay activates successfully, connect it to your Square account.
Step 2: Connect WP Easy Pay to Square
WP Easy Pay uses Square for payment processing.
Connect your Square account before configuring Apple Pay.
- In your WordPress dashboard, go to WP Easy Pay → Square Connect.
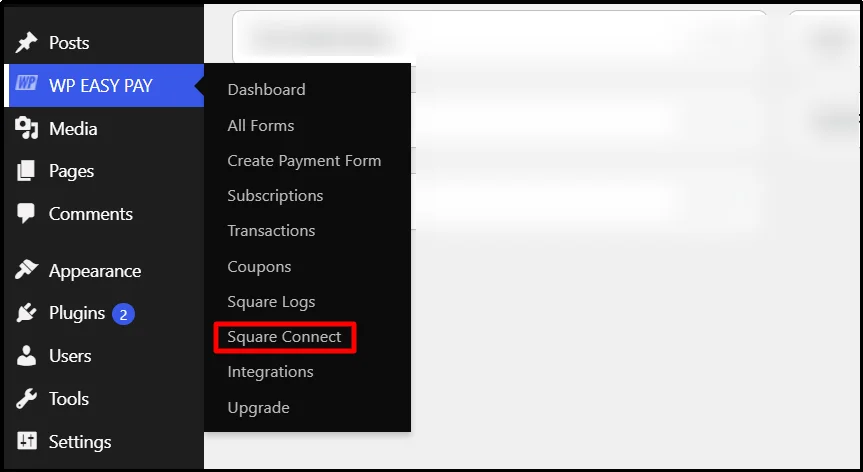
- Choose Sandbox when you want to test the payment workflow.
- Switch to Live Payments when you’re ready to accept real payments.
- Click Connect Square.
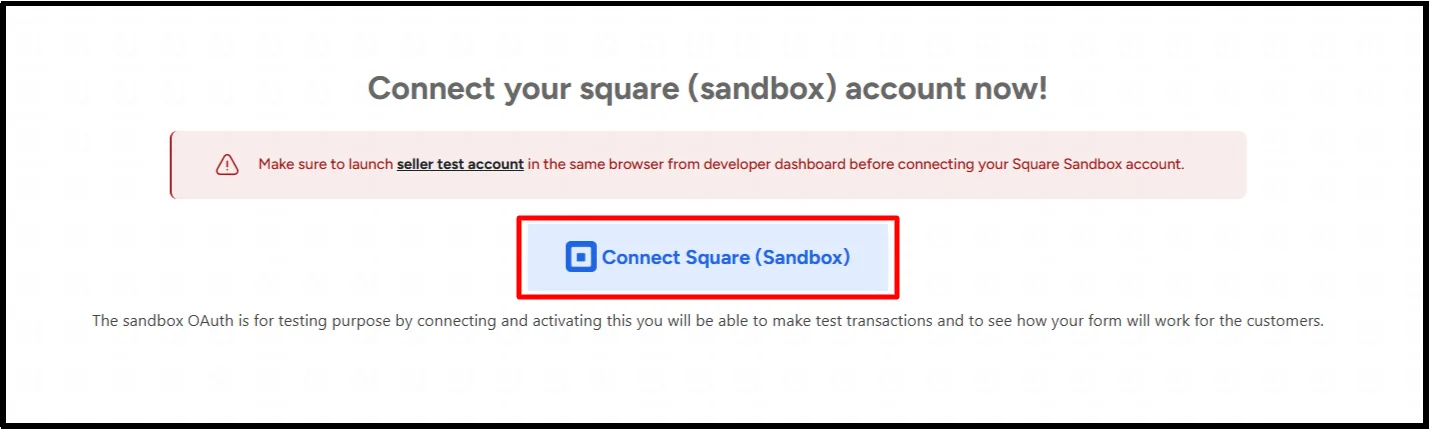
- Sign in to your Square account.
- Authorize the connection.
- After authorization, select THAT’S MY SITE – REDIRECT ME to return to WordPress.
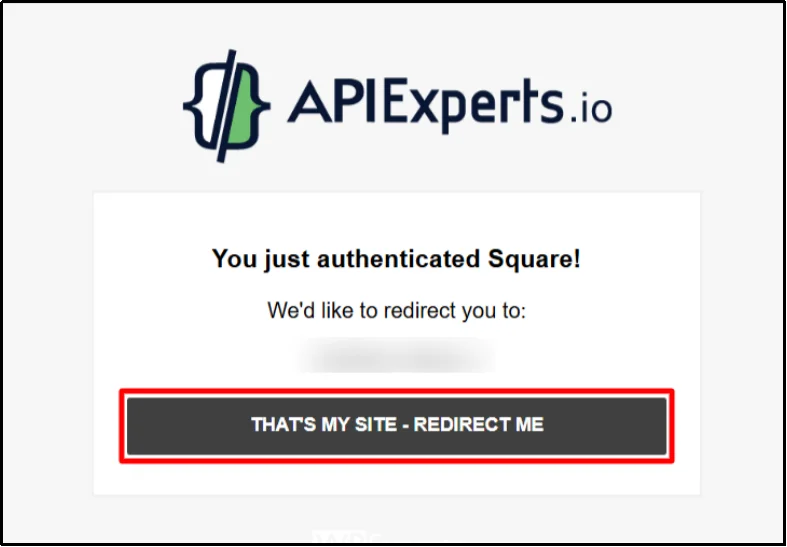
Sandbox mode gives you a place to test your form before sending customers to your live payment page.
And that’s exactly where you should start.
Step 3: Enable Apple Pay and Verify Your Domain
Now enable Apple Pay in your WP Easy Pay Square settings.
- Go back to WP Easy Pay → Square Connect.
- Find the available payment methods.
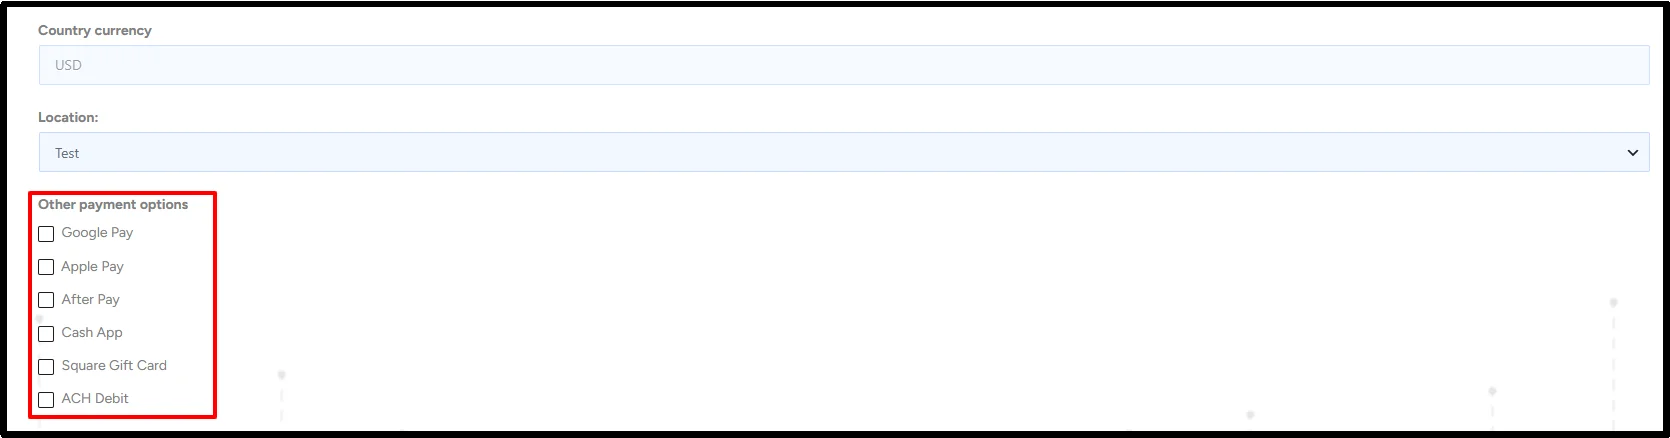
- Select Apple Pay.
- Choose Verify Domain.
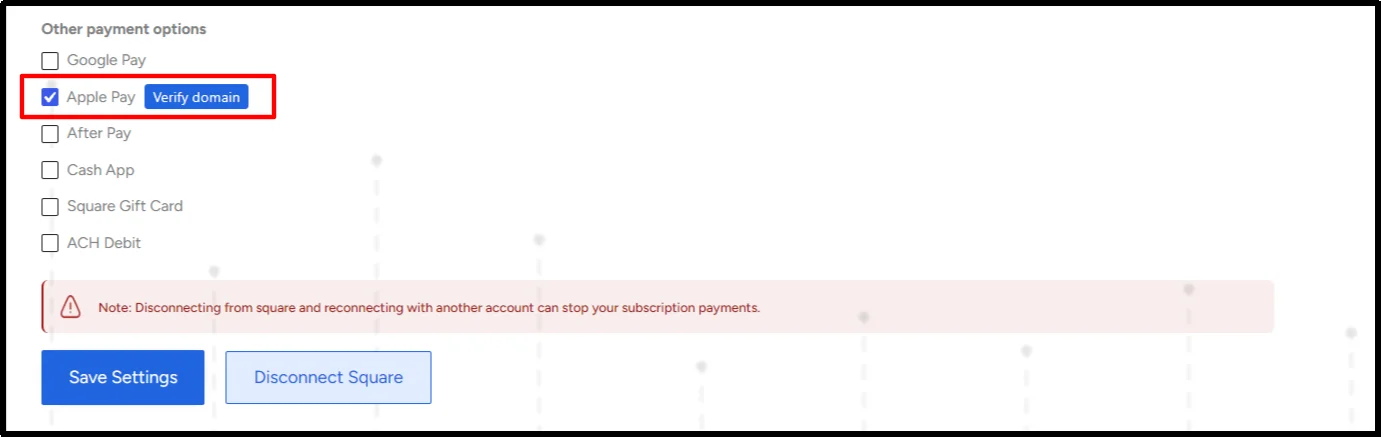
- Complete the domain-verification process.
- Save your settings.
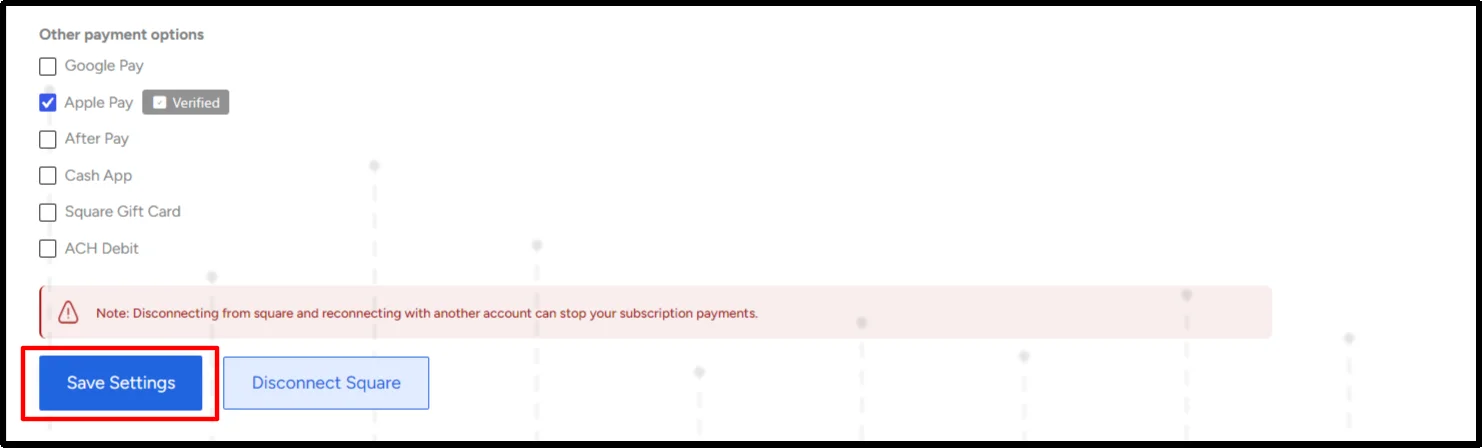
Domain verification matters because Apple Pay on the web needs a verified payment domain. Square’s current Apple Pay documentation describes domain registration for both Sandbox and production environments.
Make sure your payment domain uses HTTPS.
Your Apple Pay settings are now configured. Next, create a payment form and test the complete payment flow.
Step 4: Create and Publish Your WordPress Payment Form
Create a new WP Easy Pay payment form, or edit an existing form where you want to offer Apple Pay.
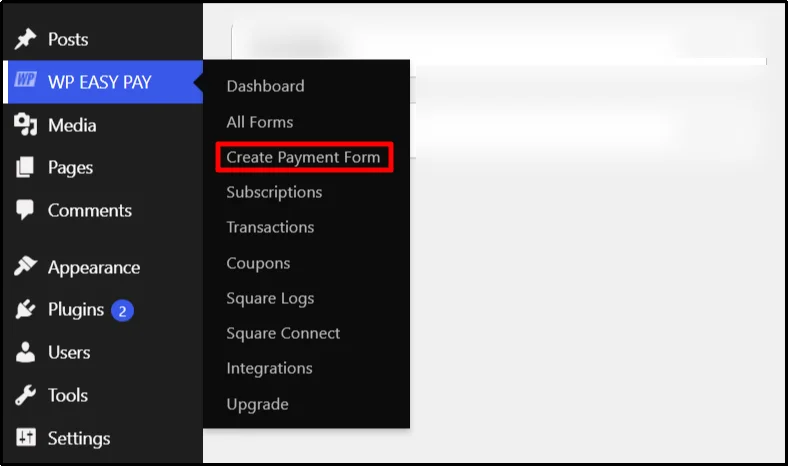
- Go to WP Easy Pay → Create Payment Form.
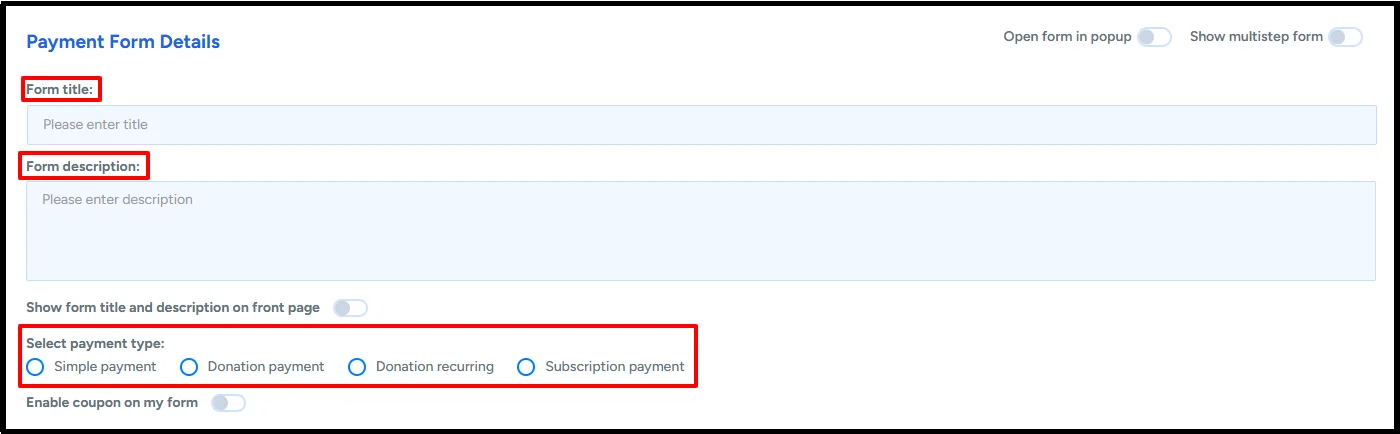
- Add a form title and description.
- Choose the payment type that matches your use case.
- Configure your payment amount and customer fields.
- Configure any required transaction details or notifications.

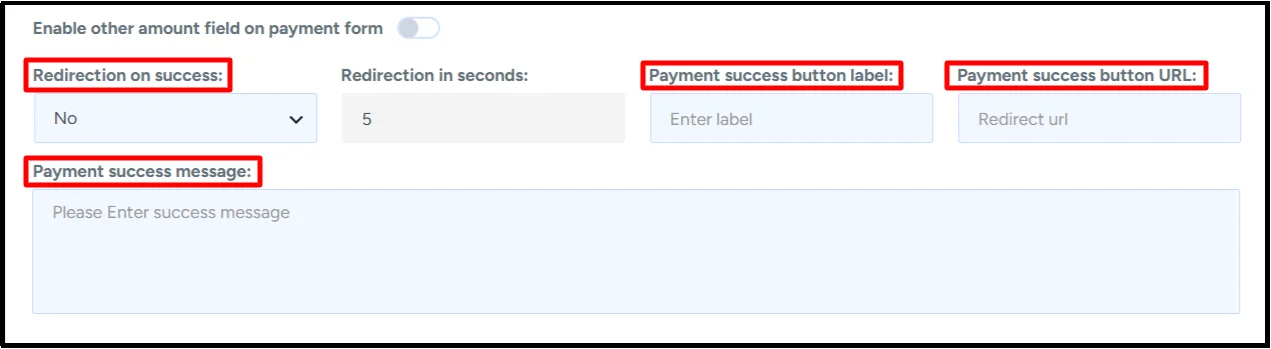
- Choose Redirection on Success if you want to send customers to a specific page after payment.
- Add a custom success message if needed.
- Click Publish.
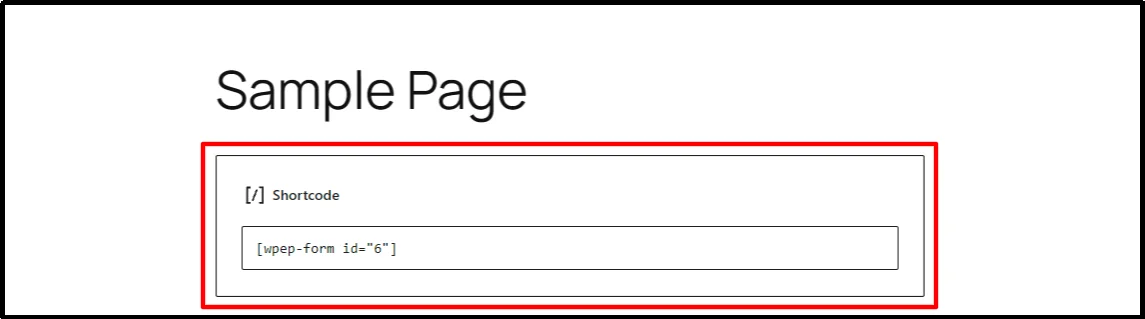
- Copy the form shortcode if you want to embed the form with a shortcode.
WP Easy Pay also supports WordPress block-based form embedding, so you can add the payment form directly through the WordPress editor.
To create a dedicated payment page:
- Go to Pages → Add Page.

- Enter a page title, such as Pay Your Invoice.
- Add the WP Easy Pay block to the page, or paste the payment form shortcode.
- If you use the WP Easy Pay block, select the correct payment form.
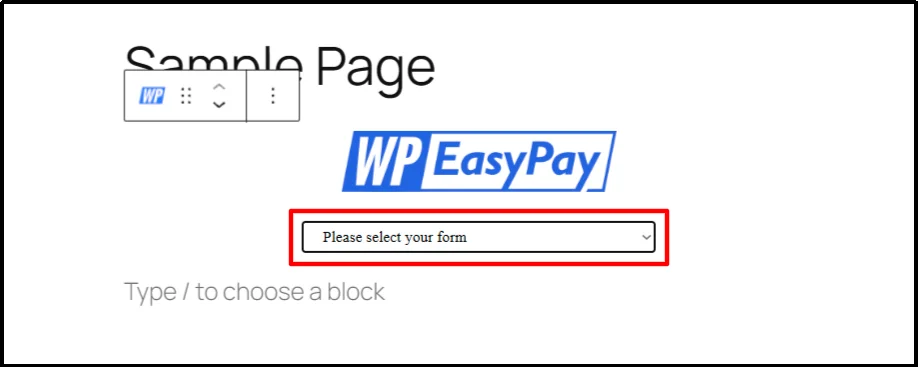
- Publish the page.
- Open the published page in a supported test environment.
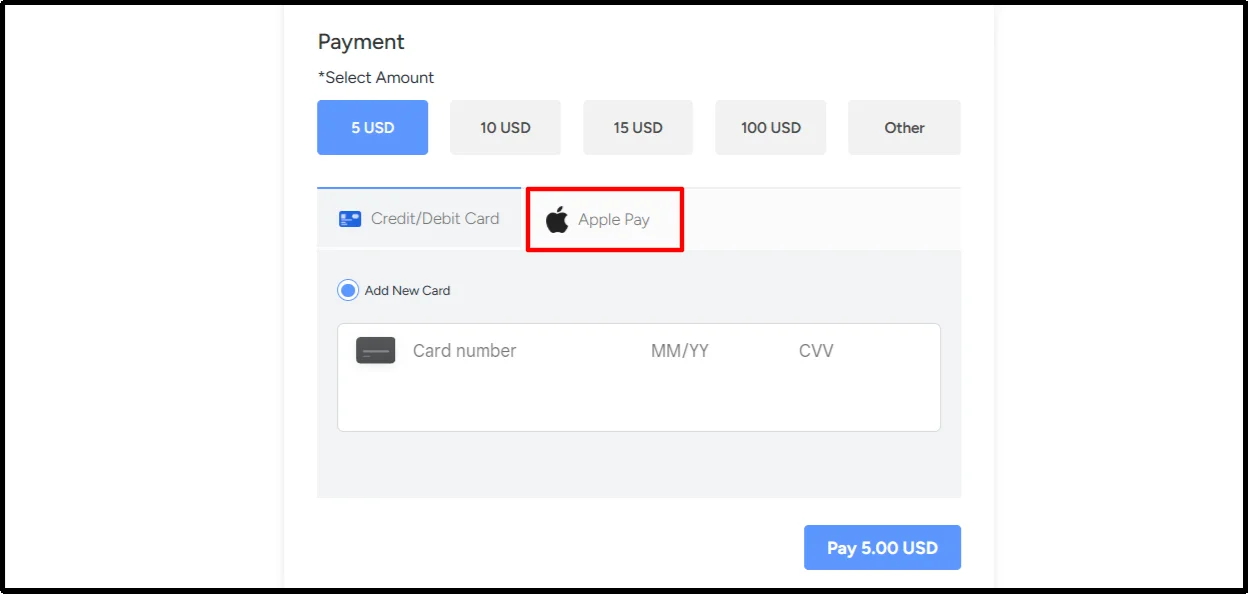
Don’t send customers there yet. Test it first.
How to Test Apple Pay on Your WordPress Site
A successful configuration doesn’t automatically mean your live payment flow works exactly as expected.
Test the complete journey before accepting real customer payments.
Open your published payment form on a supported device and browser. Check that the Apple Pay button appears, open the Apple Pay payment sheet, and verify that the payment reaches the expected Square environment.
For Square’s Web Payments SDK, Apple Pay testing requires an HTTPS domain and a valid payment card in Apple Wallet. Square doesn’t support fake Apple Pay test card values; when you test through Square Sandbox, the valid card in your Apple Wallet isn’t charged.
Use Sandbox Before Live Payments
Start with Sandbox mode.
Check these items:
- The payment form loads correctly.
- The Apple Pay button appears when the integration supports it.
- Apple Wallet contains an eligible card.
- The payment screen opens correctly.
- The test transaction reaches the expected Square environment.
- Your success message or redirect works.
- Other payment methods remain available when Apple Pay isn’t eligible.
Once everything works, repeat the relevant checks in your live environment.
Then switch to live payments only when you’re comfortable with the result.
Apple Pay Button Not Showing in WordPress? Try These Fixes
The Apple Pay button won’t necessarily appear for every visitor.
That’s normal.
Apple Pay availability can depend on the customer’s device, browser, Apple Wallet setup, country, payment integration, and other eligibility checks. Square’s Apple Pay implementation also defines its own technical requirements.
If the button doesn’t appear, work through these checks.
1. Check Your Device and Browser
Test the payment form using a device and browser supported by your Apple Pay integration.
For the Square Web Payments integration, Square currently documents Apple Pay support through Safari on supported iOS and macOS configurations.
Don’t assume that every browser supports the same Apple Pay flow.
Apple has expanded Apple Pay support to certain third-party browser configurations, including flows where customers start on a computer and complete payment with an iPhone, but that broader Apple capability doesn’t automatically mean every payment provider and WordPress integration supports the same browser experience.
If you’re using WP Easy Pay with Square, follow the browser support documented for that integration.
2. Check Apple Wallet
Make sure your test device has an eligible payment card in Apple Wallet.
A supported device alone doesn’t guarantee that Apple Pay can complete a payment.
The Wallet must also contain a qualifying payment credential for the payment flow you’re testing.
3. Check HTTPS
Open the payment page and confirm that it uses HTTPS.
Square requires secure contexts for its Web Payments SDK, and Apple Pay can’t run from an HTTP or localhost page in Square’s documented web integration.
4. Check Domain Verification
If your integration requires domain verification, confirm that the payment domain completed verification successfully.
Square provides Apple Pay domain registration for its web integration, including Sandbox and production domains.
If verification fails, check your HTTPS configuration and make sure the required domain-verification setup remains accessible.
5. Check Square Payment Settings
Open your WP Easy Pay Square settings and confirm that Apple Pay remains enabled.
Also check your Square account configuration and the payment methods available for your market.
6. Check Sandbox or Live Mode
A Sandbox payment flow isn’t the same as a live transaction.
Confirm that your WordPress form and Square connection use the environment you’re trying to test.
If you’re testing in Sandbox, use the Apple Pay testing requirements documented by Square rather than entering a fake Apple Pay card number.
7. Check Country and Payment Support
Apple Pay availability can vary according to the country, payment processor, payment method, and account configuration.
Square documents Apple Pay availability across the regions where Square operates, but payment-method availability can still vary by market and integration.
Check your Square account and current regional documentation before assuming that a payment method should appear.
8. Check Plugin and WordPress Compatibility
Make sure your WP Easy Pay version, WordPress installation, PHP environment, and Square integration meet the plugin’s current requirements.
Payment integrations can change when you update WordPress, PHP, plugins, or third-party services.
If Apple Pay stopped appearing after an update, check the plugin and payment-provider documentation before changing your entire checkout setup.
9. Clear WordPress and CDN Cache
If you recently changed Apple Pay settings, clear your WordPress and CDN caches.
A stale cached page can prevent the browser from receiving the latest version of your payment form or integration scripts.
Reload the payment page after clearing the cache.
Why Isn’t Apple Pay Available for Every Customer?
Apple Pay doesn’t have to appear for every visitor.
The integration checks whether the payment method can work in the customer’s current environment; device, browser, Wallet configuration, payment setup, and other conditions can affect availability.
When Apple Pay isn’t available, your payment form can continue displaying other supported payment methods.
That’s one reason you shouldn’t make Apple Pay the only way to pay.
Apple Pay vs. Credit Cards on WordPress
Apple Pay doesn’t need to replace traditional card payments.
Offer both when your payment integration supports them.
| Feature | Apple Pay | Traditional card entry |
| Card number entry | Usually avoided | Customer enters card details |
| Authentication | Apple Pay payment flow and device authentication | Card and checkout authentication |
| Checkout experience | Fast wallet checkout for eligible customers | Depends on the checkout form |
| Availability | Depends on device, browser, country, Wallet, and integration | Depends on processor, card network, country, and checkout configuration |
| Payment processor | Required | Required |
| Typical use | Fast wallet checkout | Card payments across supported checkout environments |
Apple Pay can reduce the amount of information customers need to enter during checkout.
Card payments still give customers another way to pay when Apple Pay isn’t available.
Can You Accept Apple Pay and Other Payment Methods Together?
Yes.
Apple Pay doesn’t have to replace credit or debit cards.
A compatible payment integration can present multiple payment methods on the same page. Square’s Web Payments SDK supports Apple Pay, Google Pay, cards, ACH, Cash App Pay, and Afterpay/Clearpay, although the available methods depend on the applicable setup and market.
WP Easy Pay supports Apple Pay along with other Square-powered payment methods, including:
- Apple Pay
- Google Pay
- Credit and debit cards
- Cash App Pay
- ACH Debit
- Afterpay
The available options can depend on your Square account, region, and WP Easy Pay configuration.
Offering several payment options lets customers choose the method that works for their device and payment preferences.
Apple Pay on WordPress vs. WooCommerce
You don’t need WooCommerce simply to accept Apple Pay.
WooCommerce stores can add Apple Pay through compatible payment gateways and extensions, while service businesses, nonprofits, freelancers, and other WordPress sites can use a payment form plugin such as WP Easy Pay.
The better approach depends on what you’re selling.
If you need a complete online store with products, carts, orders, inventory, and checkout management, WooCommerce may fit your business model.
If you mainly need dedicated payment forms for services, invoices, donations, registrations, or one-time payments, a WordPress payment form plugin can give you a simpler setup.
Do You Need an Apple Developer Account to Add Apple Pay to WordPress?
Not necessarily.
The requirement depends on the payment processor and integration you’re using.
Not necessarily. With Square’s Web Payments integration, you don’t need to create an Apple Merchant ID or call Apple’s APIs directly to enable Apple Pay. However, a custom Apple Pay integration can require Apple Developer account configuration.
Ready to Accept Apple Pay on Your WordPress Site?
Adding Apple Pay doesn’t mean you need to build a checkout system from scratch.
With WP Easy Pay and Square, you can create WordPress payment forms and offer Apple Pay alongside other supported payment methods. WP Easy Pay also supports payment use cases such as one-time payments and donations, with additional payment options available through its Square integration.
The setup is simple: connect Square, enable Apple Pay, verify your domain, create your payment form, and test the payment flow before going live.
Ready to add Apple Pay?
Get WP Easy Pay and start creating WordPress payment forms with Apple Pay and other supported payment methods.
Frequently Asked Questions
Can I add Apple Pay to WordPress without WooCommerce?
Yes. You can accept Apple Pay without WooCommerce by using a WordPress payment form plugin that supports Apple Pay through a compatible payment processor. WP Easy Pay connects WordPress payment forms with Square and supports Apple Pay.
Does Apple Pay work with WordPress payment forms?
Yes. A compatible WordPress payment form plugin can connect Apple Pay to your payment processor. With WP Easy Pay, Apple Pay works through its Square integration.
Can I accept Apple Pay without coding?
Yes. A supported WordPress payment form plugin can handle much of the integration work for you, so you don’t need to build Apple’s payment APIs yourself. Your exact setup still depends on the payment processor, plugin, account, and domain-verification requirements.
Does Apple Pay work on Chrome?
It can support third-party browser configurations, but don’t assume that every Apple Pay integration supports the same browser experience.
Apple supports Apple Pay on additional browser and device configurations, including flows where customers start on a computer and complete the payment on an iPhone.
However, Square’s current Web Payments documentation specifically documents Apple Pay support through Safari. If you’re using WP Easy Pay with Square, follow the browser support documented for that integration rather than assuming Chrome support.
Do I need HTTPS for Apple Pay?
Yes. Your payment page needs a secure HTTPS connection. Square’s Web Payments SDK requires secure contexts, and its Apple Pay integration doesn’t support HTTP or localhost for Apple Pay payments.
Does Apple Pay charge an additional fee?
Apple Pay itself doesn’t add a separate transaction fee to your payment.
Your payment processor can still charge its normal processing fees and any other applicable charges, so check your processor’s current pricing for the fees that apply to your account.
Can I accept Apple Pay for donations?
Yes, eligible donation payment flows can support Apple Pay when the payment processor and WordPress payment plugin support the required configuration.
Apple also documents Apple Pay donations for eligible nonprofit organizations.
WP Easy Pay supports donation payment forms through its Square integration.
Can customers pay with Apple Pay on a desktop?
Yes, on supported configurations.
Apple Pay supports compatible Macs, and Apple also supports certain third-party browser flows where customers can start the payment on a computer and complete it with an iPhone.
The exact experience depends on the device, browser, Wallet setup, and payment integration.
Why isn’t Apple Pay showing on my WordPress payment form?
Start with the basics.
Check the device and browser, Apple Wallet payment card, HTTPS configuration, domain verification, Square settings, Sandbox or Live mode, country availability, and plugin compatibility.
If you recently changed your payment configuration, clear your WordPress and CDN cache and reload the payment page.
Do I need to verify my domain for Apple Pay?
Your Apple Pay web integration may require domain registration or verification before it can accept payments.
Square’s Web Payments documentation requires Apple Pay domains to be registered for Sandbox and production use.
If you’re using WP Easy Pay with Square, follow the domain-verification process provided by the plugin and Square.
Can I test Apple Pay before accepting live payments?
Yes. Use Square Sandbox to test your payment flow before switching to live payments. Square’s documentation says you need a valid card in Apple Wallet for Apple Pay testing; Sandbox doesn’t charge that card during the test.
Test the complete form, payment sheet, transaction flow, success message, and any redirect before going live.