

Building a donation campaign on your WordPress site can be a powerful way to engage supporters and raise funds for your cause. A key component of a successful campaign is a donation progress bar.
This visual tool lets visitors see exactly how close you are to reaching your fundraising target in real time.
Whether you’re a non-profit, an individual fundraiser, or a business running a charity drive, adding a progress bar can make your campaign feel more dynamic and transparent.
This guide will walk you through the simple, no-code process of setting up a live donation progress bar on your site, helping you track your fundraising efforts with ease.
What is a Donation Progress Bar?
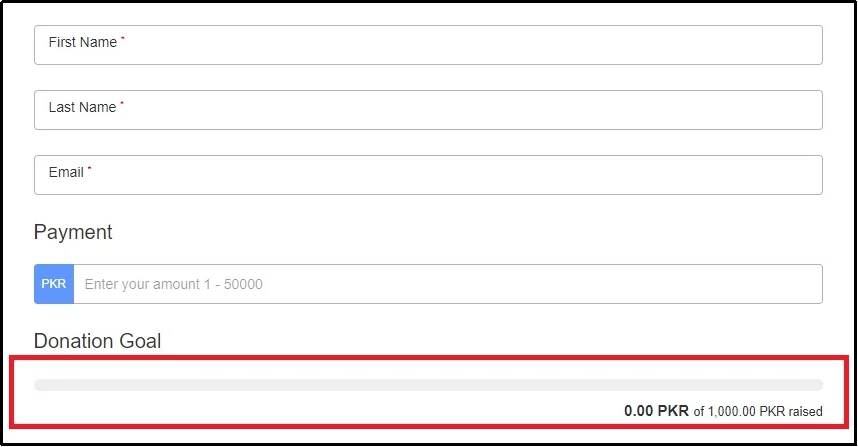
A donation progress bar is a visual fundraising tool that tracks and displays how much money has been raised toward a specific goal. Instead of simply listing amounts collected, the bar fills up in real time as donations come in, showing visitors exactly how close you are to reaching your target.
For example, if your campaign goal is $10,000 and you’ve already raised $7,500, the progress bar will show 75% completion. This immediate visual feedback helps donors understand the impact of their contributions at a glance.
Donation progress bars are widely used by:
- Nonprofits and charities running fundraising campaigns
- Schools, clubs, and community groups seeking support for projects
- Businesses organizing charity drives or social initiatives
- Individual fundraisers collecting money for personal causes
By making fundraising goals clear, transparent, and interactive, a progress bar transforms static donation pages into engaging experiences. It not only motivates existing donors to give more but also encourages new visitors to contribute, since they can see the campaign actively moving toward success.
👉 In short, a WordPress donation progress bar is more than just a number tracker—it’s a powerful way to build trust, boost engagement, and inspire generosity.
Why Add WordPress Donation Progress Bar?
Adding a donation progress bar to your fundraising campaign is a strategic tool that can significantly boost contributions and donor engagement. It provides a real-time, transparent view of your campaign’s progress, creating a sense of community and urgency. Here are a few advantages:
- Fosters Transparency & Trust: A progress bar visually demonstrates where your fundraising stands, showing potential donors that their contributions directly impact your campaign’s success.
- Creates a Sense of Urgency: As the progress bar gets closer to the goal, it creates a visual sense of urgency. Donors can see that their contribution could be the one that helps the campaign reach its target. This encourages people to give sooner rather than later.
- Encourages Social Proof: Seeing a bar that is already partially filled shows that others have already contributed to the cause. This acts as a form of social proof, reassuring new donors and making them more likely to donate themselves.
- Provides a Community Goal: A progress bar turns a solo fundraising effort into a shared community goal. It gives donors a collective mission to work toward, which can increase their motivation and personal investment in the campaign.
- Offers a Clear Call to Action: The progress bar serves as a continuous, visual call to action. It clearly communicates the objective and motivates visitors to help close the gap.
4 Easy Steps to Add a WordPress Donation Progress Bar
Since WordPress doesn’t have a default option for adding a donation progress bar, we will be using the WP EasyPay plugin for it.
WP EasyPay is a user-friendly WordPress plugin designed to simplify the process of accepting payments on your website. It allows businesses, non-profits, and individuals to create professional-looking payment and donation forms without any coding knowledge.
The plugin is a secure and flexible solution for managing transactions directly on your site.
It’s an ideal tool for anyone looking to raise funds, sell products, or collect payments, providing a secure and customizable platform for a variety of needs. With its helpful set of features, WP EasyPay helps you streamline your payment collection process and enhance the overall experience for your customers and donors.
Here are some of the key features of the plugin:
- Diverse Payment Options: It supports tons of payment methods, allowing you to accept everything from credit and debit cards to modern digital wallets like Google Pay, Apple Pay, Cash App, and BNPL services like Afterpay. This flexibility makes it easier for your customers to pay in a way that’s convenient for them.
- Intuitive Form Builder: The plugin includes a drag-and-drop form builder that makes creating custom payment and donation forms simple. You can easily add various fields to design forms that fit your specific needs, whether for a one-time purchase or a recurring donation.
- Secure & PCI Compliant: Security is a top priority with WP EasyPay. The plugin processes all payments through Square, which is a level-one PCI-compliant, protecting both your business and your customers’ sensitive financial information.
- Subscription Management: WP EasyPay provides a comprehensive payment management tool. You can effortlessly handle subscriptions with the reporting feature, which lets you review, adjust, and monitor subscription data as needed.
- Shortcode Support: Add the form anywhere on your site using the shortcode.
- Goal Tracking & Progress Bars: A key feature for donation campaigns is the ability to set a specific fundraising goal. WP EasyPay lets you enable a progress bar that shows your visitors, in real-time, how close you are to reaching your target. This visual feedback is highly motivating for donors.
- Square POS Integration: For businesses using Square, WP EasyPay can sync with your Square, automatically updating product names, prices, and stock levels, ensuring your online and in-person sales data is always consistent.
Take a look at all the features here.
Now that you understand why we chose WP EasyPay, let’s jump right into the steps.
Step 1. Install and Activate WP EasyPay
Since the “Enable Goal” feature that allows for enabling the WordPress donation bar is exclusive to premium plans only, let’s install the plugin first. Follow the steps to get it done:
- Firstly, visit the official website and navigate to the pricing page and purchase a plan of your choice.
- You will receive a welcome email with the premium plugin’s ZIP file along with the license key, which is a string of random letters, characters, and numbers. Save the ZIP file on your device and store the license key, as we will use it later.
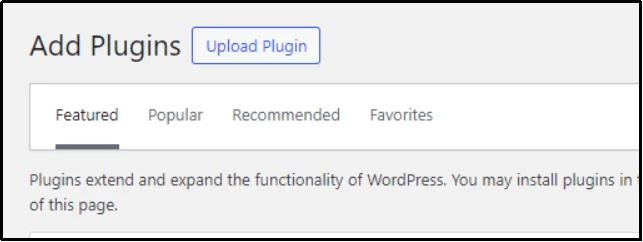
- Next, navigate to your admin dashboard → Plugin → Add Plugin → Click Upload Plugin from the top left corner.
- Use the Choose File button and browse the ZIP file that you downloaded just now.
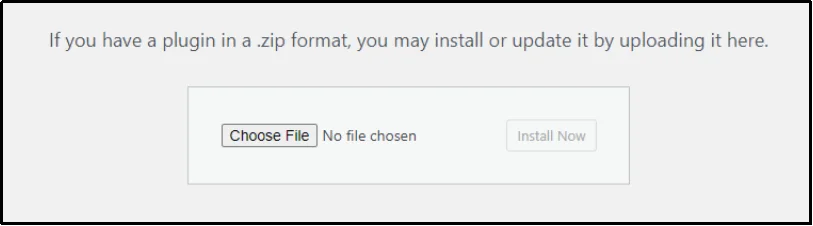
- Finally, use the Install Now button to install the plugin.
- Once installed, you will see the Activate button on the subsequent screen, activate it, and let’s move on to the next step.
Step 2. Connect with Square
As discussed, WP EasyPay processes payments through Square.
Before you go live and start accepting real payments, it’s crucial to test your payment form. WP EasyPay offers two distinct modes for this purpose:
- Test Payment Mode: When you first connect your account, it’s highly recommended to use the Test Payment Mode. This setting connects your site to a Square Sandbox account, which is a secure testing environment. It allows you to create and process dummy transactions without using any real money.
- Live Payment Mode: Once you are confident that your form works as intended, you can switch to Live Payment Mode. This setting connects your site to your real Square production account, enabling you to start accepting real payments from your customers and donors officially.
To connect Square with WP EasyPay, follow along:
- Navigate to WP EasyPay → Square Connect.
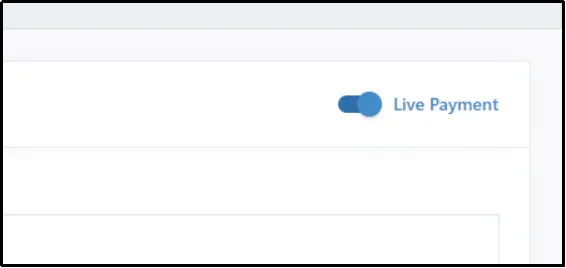
- Switch to Live Payments using the toggle in the top-right corner.
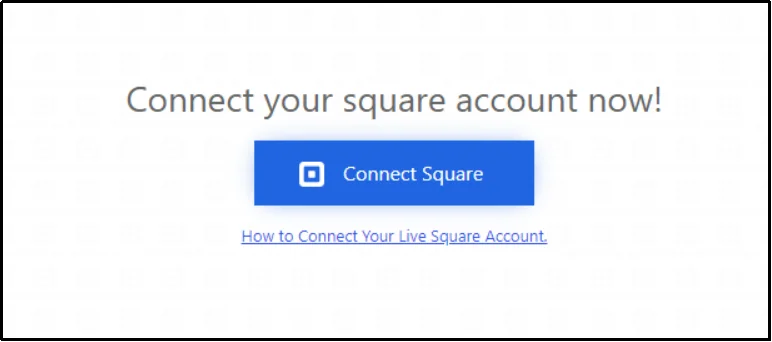
- Click Connect Square.
- Log in using your credentials.
- On the subsequent screen, Square will ask you for the necessary permissions, review, and click Allow.
- Finally, you will be redirected to the following screen, which will ask you if that’s the correct website you want to connect with Square. Click “THAT’S MY SITE – REDIRECT ME” to establish the connection.

Step 3. Create a Form With WordPress Donation Progress Bar
Let’s do what you came here for. To do so, you must create a form with a specific “goal” payment that would show a progress bar indicating how far or near you are to the specified goal.
You can do that by following these steps:
- Navigate to WP EasyPay → Create Payment Form
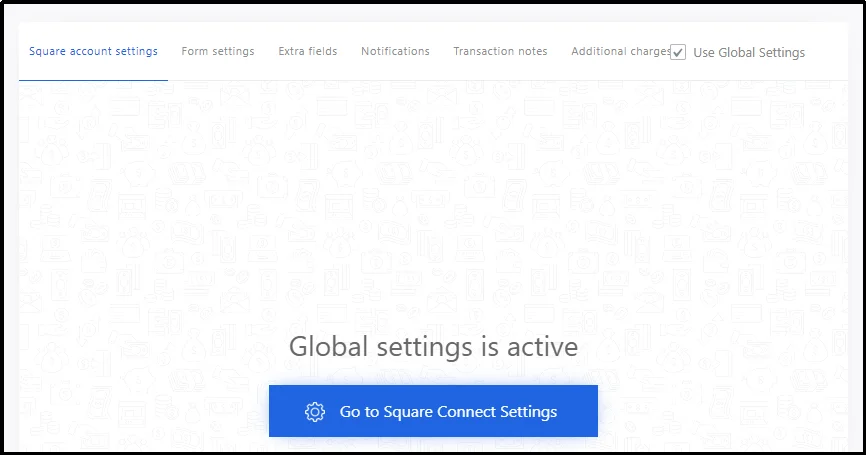
- In the “Square account settings” tab, check the Use Global Settings checkbox. This will force the plugin to use the Square settings that we did in the previous step.
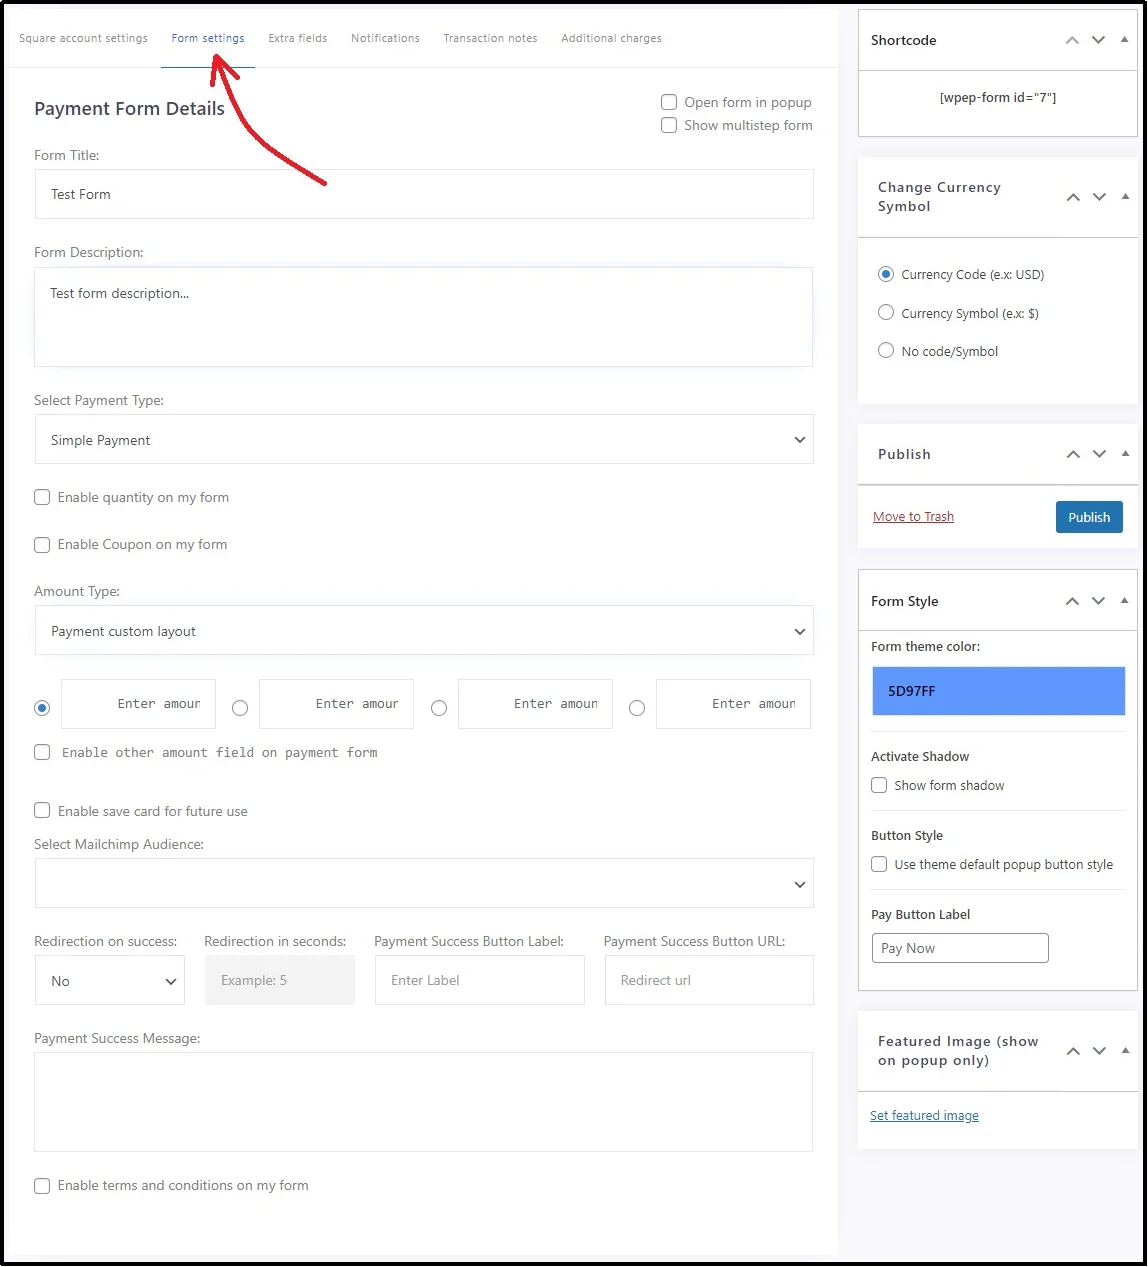
- Next, switch to the form settings tab and fill it out with the necessary details, including the form title and the form description.
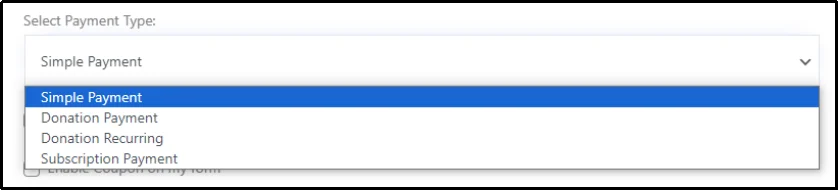
- In the Select Payment Type dropdown, select Donation Payment.
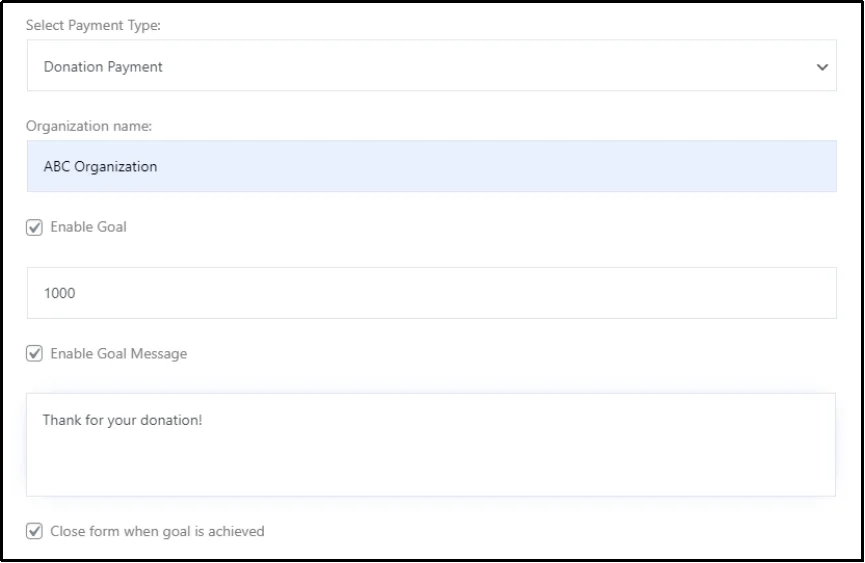
- Selecting donation payment will reveal a few more options exclusive to donation payments only.
- Enter your organization’s name, and check the Enable Goal checkbox. You can also make the form close by itself once the goal is achieved by checking the “Close form when goal is achieved” checkbox.
- Make sure the settings align with your goals, and finally publish.
- There you go! You just created a WordPress donation form with a progress bar. Now, all you have to do is place it wherever you want.
Step 4. Place The Form
WP EasyPay offers two ways to add forms to pages. You can do so either through Gutenberg blocks or shortcodes.
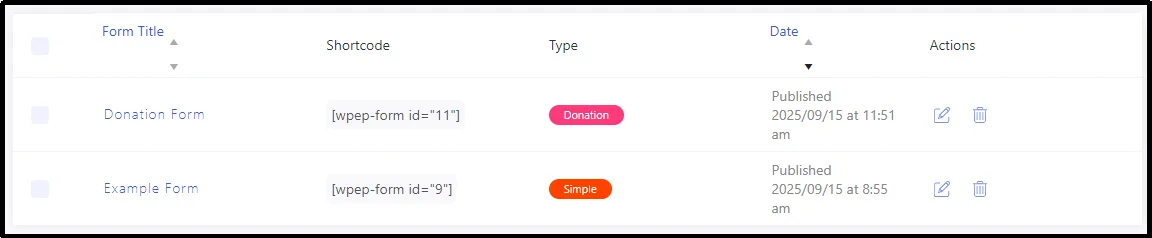
To find the shortcodes, navigate to the WP EasyPay settings → All Forms. You can see all your forms here, along with their shortcodes. Copy the code and paste it where you want the form to appear.
Alternatively, go to any post or page of your choice and search for WP EasyPay blocks.
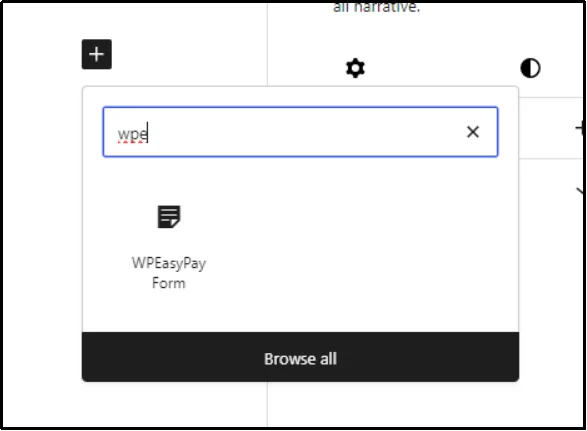
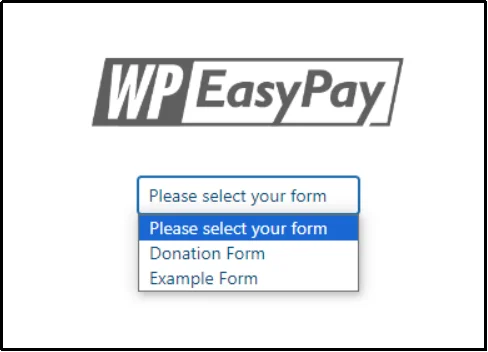
Place the block, select the form you want from the drop-down menu, and then publish.
There we go! The donation form is now live, featuring a donation progress bar.
Unlock Your Fundraising Potential with WP EasyPay!
There you have it! In just a few simple, no-code steps, you’ve learned how to leverage the power of WP EasyPay to create an engaging donation campaign on your WordPress site. By adding a live progress bar, you’re building a transparent, goal-oriented community around your cause.
WP EasyPay makes it easy to bring your fundraising goals to life, transforming a static page into an active, motivating tool that drives your supporters to action.
With its amazing features and easy integration, the plugin makes it super simple to manage and accept donation payments. So go ahead, set your goal, share your story, and watch your progress unfold.Download WP EasyPay now!
