

If you accept payments on your WordPress site, protecting the form is important. A straightforward way to do that is by adding CAPTCHA. It helps verify that the person filling out the form is a real person and not just another bot, as bots account for up to 50% of internet traffic.
This guide shows you how to add CAPTCHA to your WordPress payment form in a few clear steps. You don’t need to write a single line of code.
Before getting started, let’s take a minute to understand what CAPTCHA is.
What is CAPTCHA?
CAPTCHA stands for “Completely Automated Public Turing Test to Tell Computers and Humans Apart.” It is a small test added to a form. Its goal is to check if the user is human.
You’ve seen it before. It may ask you to type letters from a blurry image or pick traffic lights from a group of pictures. Some versions are easier. They only ask you to click a checkbox.
When a form has CAPTCHA, bots can’t submit it easily. This helps keep your site safe from spam, fake orders, and fraud.
How Does CAPTCHA Work?
CAPTCHA adds a test to your form that only humans can pass. It may show letters, numbers, images, or a checkbox. Bots cannot solve these tasks well, so they fail. When someone tries to submit the form, the CAPTCHA checks their answer. If the answer is correct, the form goes through. If not, it blocks the request.
Google reCAPTCHA’s revolutionized CAPTCHA system. Unlike regular CAPTCHAs that rely solely on the answers, it tracks simple actions like clicks, mouse movements, or even the browser history of the user. If the user seems real, the form allows them to continue without any extra steps.
This way, CAPTCHA helps filter out fake entries while letting real users through.
Why Use CAPTCHA on WordPress Payment Form?
Payment forms are often targeted by bots, flooding your site with fake entries or even testing stolen cards. CAPTCHA helps stop that. Here’s why you should use it:
- Block fake orders. Bots can fill out forms with fake names and details. CAPTCHA keeps them out, so you only get real orders.
- Stop spam. Some bots use forms to send spam. This clogs your inbox and wastes your time.
- Prevent card testing. Hackers use payment forms to test stolen cards. They try small payments to see if the card works. CAPTCHA slows down the process or blocks these attacks completely.
- Reduce server load. Too many bot entries can slow down your site. Using an anti-bot system keeps bots away, making your site run smoother.
- Protect your business. Every fake payment, spam entry, or card test is a risk. CAPTCHA helps you protect your money, time, and customer trust.
How To Use CAPTCHA on WordPress Payment Form: 4 Steps
For this guide, we will use the best plugin to accept payments on WordPress, WP EasyPay. Later, you will learn why we made this choice.
Step #1. Download WP EasyPay
Firstly, you have to download WP EasyPay premium because this feature, along with tons of others, is exclusive to the premium version only. You can choose any one that fits your needs and budget. Go here, purchase a plan, and then return for the remaining configuration steps.
Here’s a tip: switch to Lifetime to save up to 80%.

Once done, you will receive a welcome email with the plugin’s ZIP file and a license key.
Head over to WordPress ⇒ Select Add plugin ⇒ Upload Plugin ⇒ Click Choose File ⇒ Browse and select the ZIP file that comes with the welcome email ⇒ Install and Activate it ⇒ Enter your license key.
And you’re good to proceed to the next step.
Step #2. Get CAPTCHA Keys
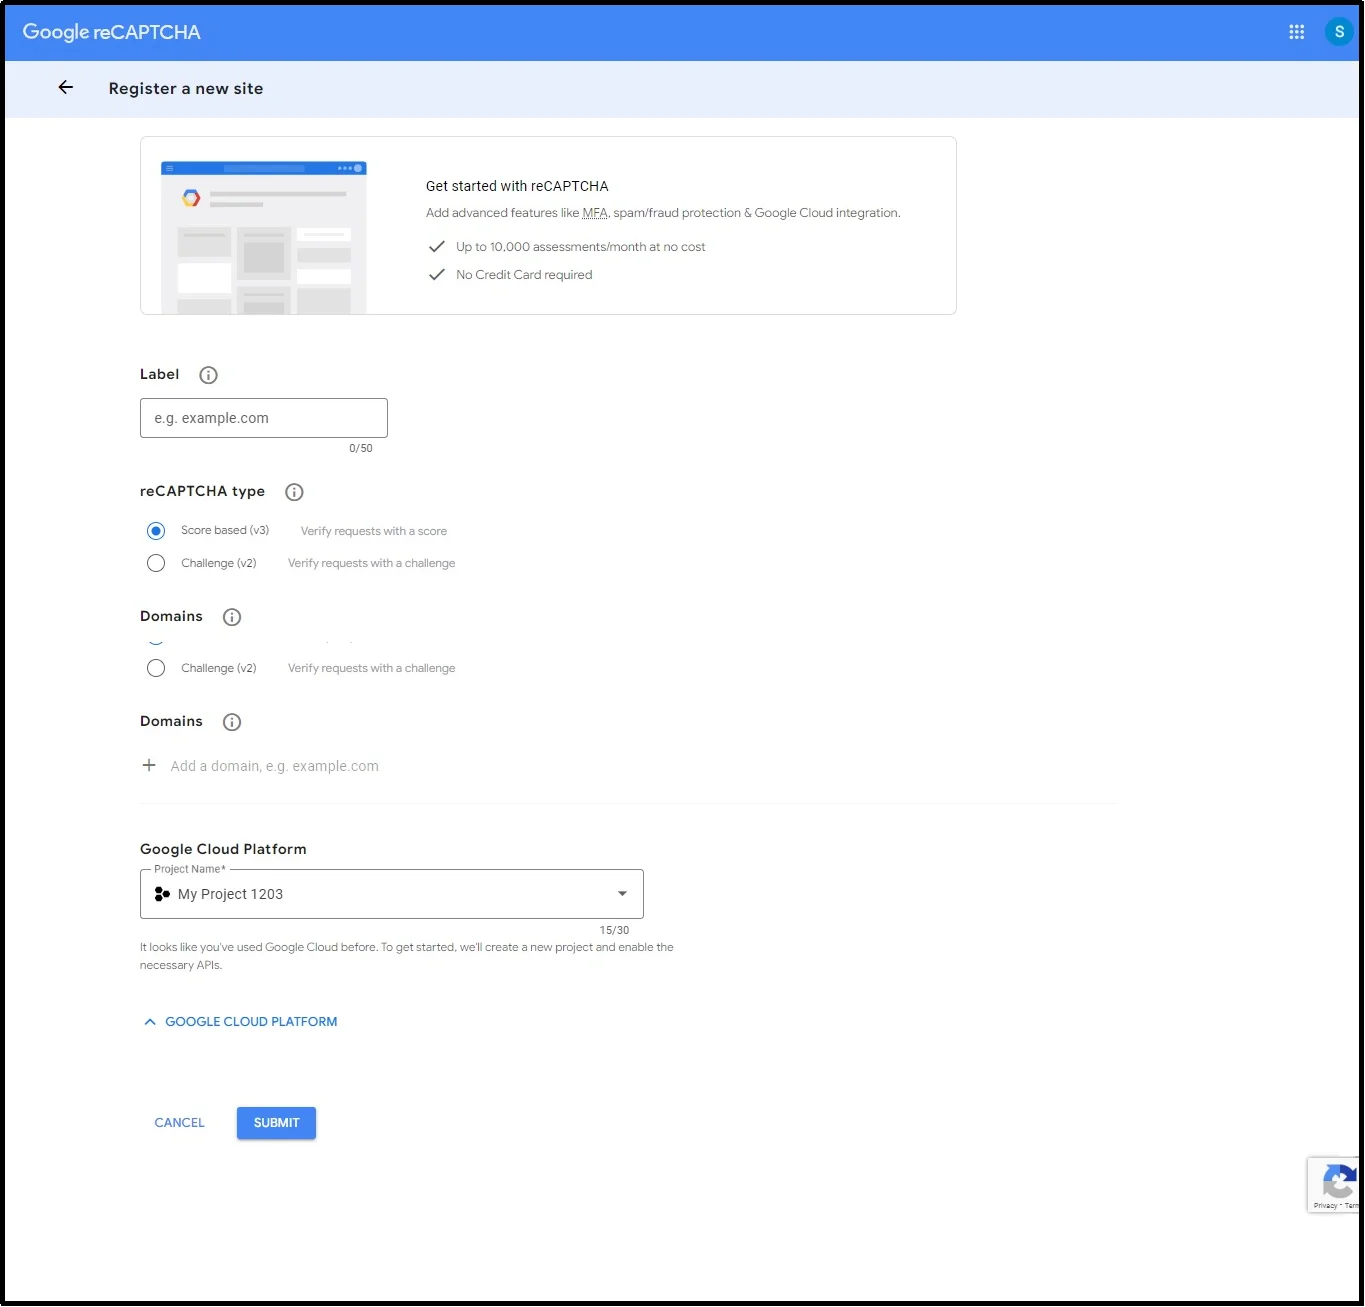
For the next step, go to Google reCAPTCHA and register a new website.
You can do so by filling in the necessary information in the following input boxes. Here’s how to go about it:
- Label your campaign.
- Choose the reCAPTCHA type; you have two choices here:
- Version 3 (v3): This reCAPTCHA type differentiates between robots and humans using a score-based system, where 1 is most likely a human and 0 is most likely a bot. The system checks the cursor pattern, browsing history, and other data assets to authenticate the user. It does not require interaction and works in the background, offering a better user experience.
- Version 2 (v2): This one is the traditional “I’m not a robot” checkbox. This one also analyzes cursor patterns. In case of uncertainty, you will be required to pass another test that may include selecting specific images with certain objects, e.g., selecting all the images that contain traffic lights.
- Add your domain. For example, yourdomain.com.
- Read and accept the reCAPTCHA terms of service.
- Click submit.
There you have your reCAPTCHA keys.
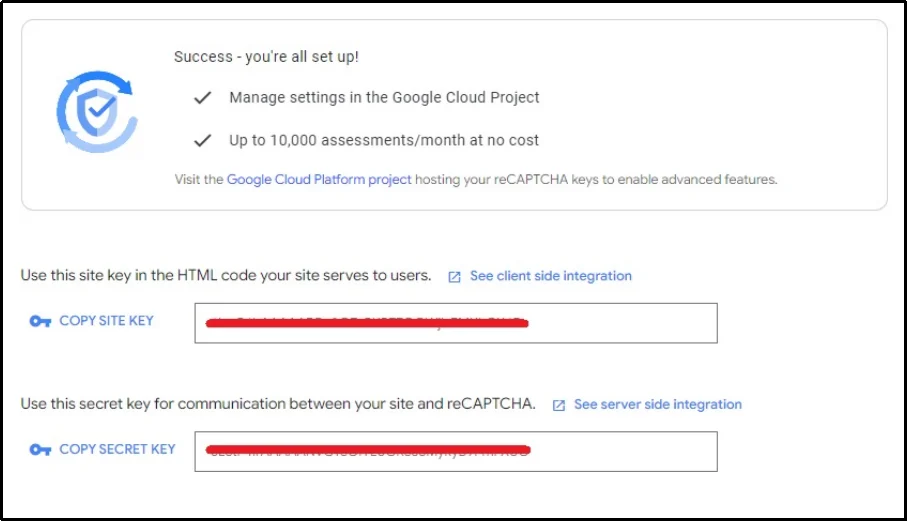
Copy these keys as we enter the third step.
Step #3. Add reCAPTCHA Keys to WP EasyPay
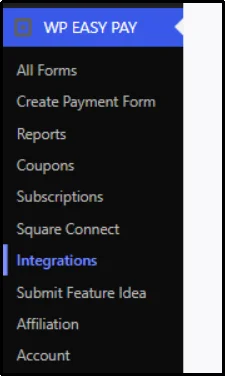
Head back to WP EasyPay’s settings ⇒ Integrations from the WordPress dashboard.
Check the Enable reCAPTCHA box and select the version from reCAPTCHA v2 or reCAPTCHA v3.
Two additional input boxes will appear.
Paste the secret and site keys we copied in the last step.
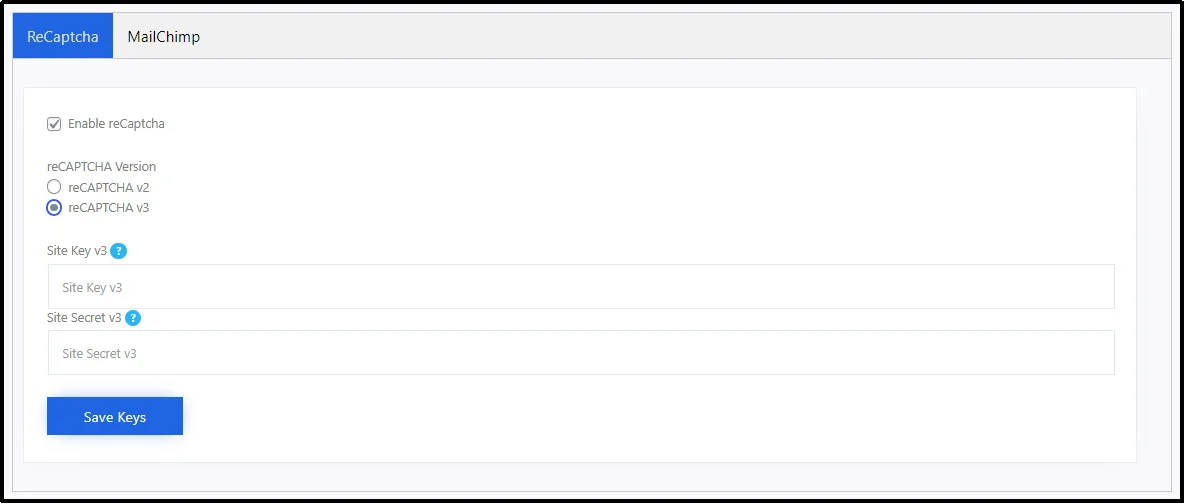
Click Save Keys.
That’s about it! Congratulations, you have successfully added CAPTCHA on the WordPress payment form. Now, let’s create a payment form and see how it looks on the front end.
Step #4. Create a New Form
Before proceeding with this step, please note if you are already using WP EasyPay and have created forms earlier, enabling these settings will add reCAPTCHA to all your existing and every form you will create in the future.
Thus, if you already have a form, you can skip this step. Otherwise, follow along and let’s create a form that is secure and free from bots!
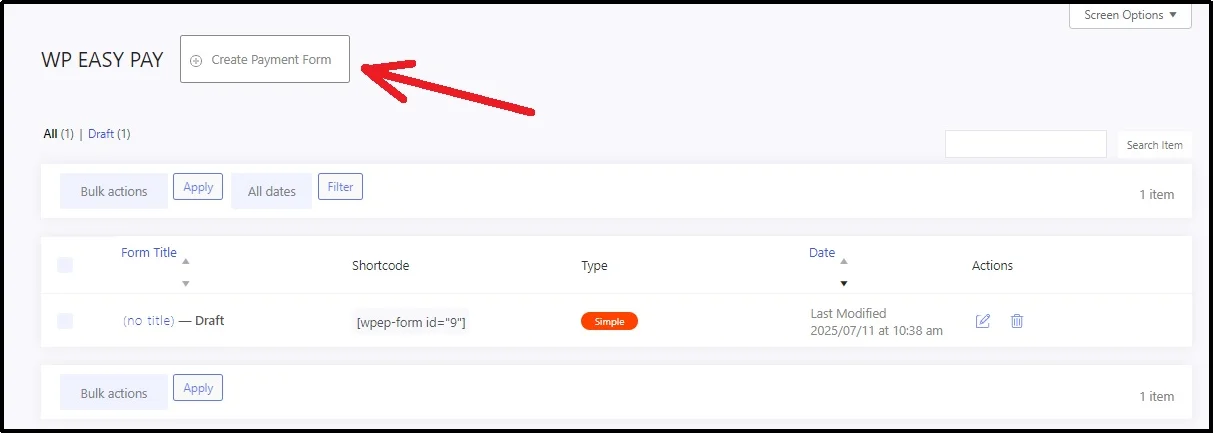
Navigate to WP EasyPay ⇒ All Forms ⇒ Create Payment Form.
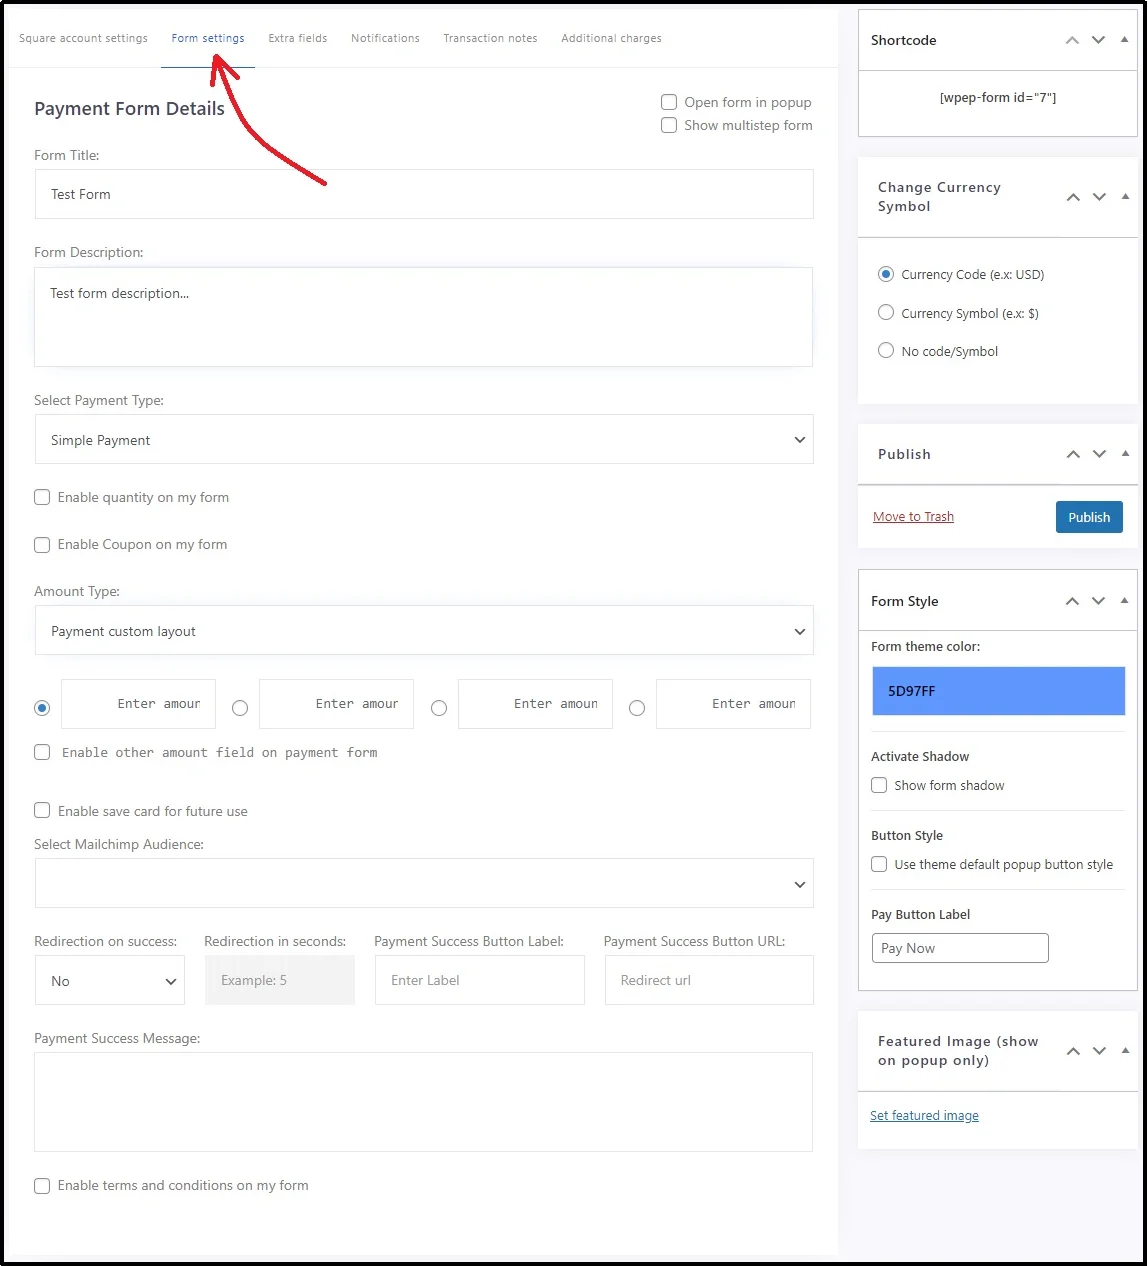
Connect with Square, if you haven’t already, and switch to the Form Settings tab.
Here, enter the necessary information, including:
- Form Title — name your form.
- Description — a small description to help your audience understand the motive behind the form, especially if it’s for donations.
- Select Payment Type — select from donation payment, subscription payment, or simple payment from the drop-down.
- Amount Type — select the amount type.
- Enter Payment Amount — allows quick selection of a widely used payment quantity. For example, if it’s a donation form, you may add donation options as, $5, $10, $15, and $20.
- Enable another amount field on payment form — if the donor wants to pay more or less than the quick buttons, checking this box will add another option that will allow them to write a custom value.
Similarly, you can add a success message and much more. On the right-hand side, change your currency, font style, theme color, and add other functionality options to make it even better and functional. This article descriptively describes the form creation process:
You might also want to read: How to Make a Payment Form in WordPress [Step-by-Step]
Publish the form and add it to your post or page.
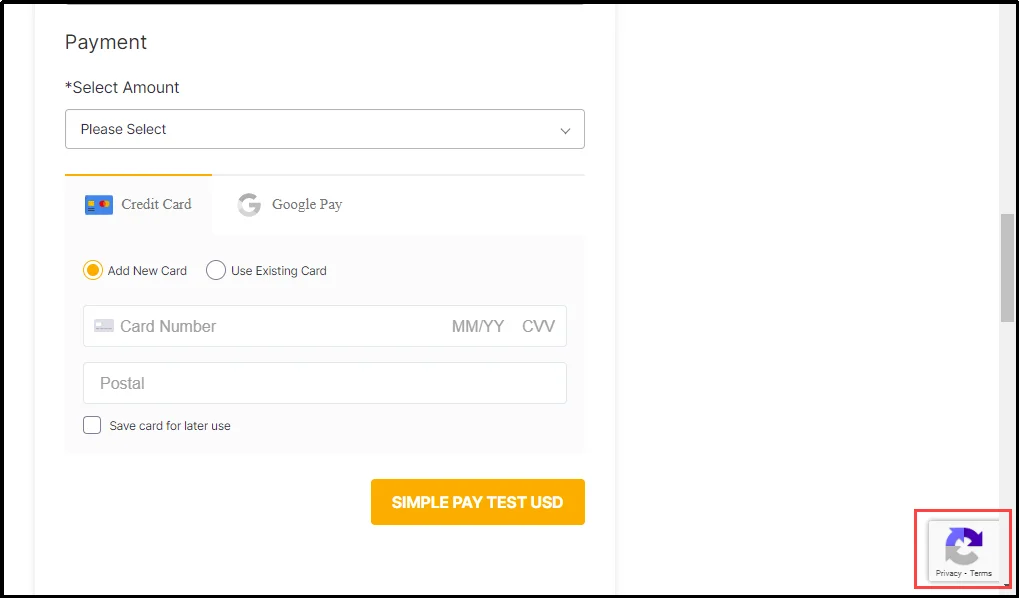
There you go! You can see the reCAPTCHA on the bottom right side of the screen.
Why We Chose WP EasyPay?
When it comes to WordPress payment forms, WP EasyPay stands out for its simplicity, flexibility, and fantastic overall features. Here’s what stands out:
- Beginner-friendly interface. You don’t need coding skills or complex setup procedures.
- Smooth Square integration. WP EasyPay works seamlessly with Square, a popular and secure payment gateway. This makes it a reliable choice for businesses of all sizes.
- Multiple payment types. Whether you’re accepting donations, recurring subscriptions, or one-time payments, WP EasyPay supports them all, as we saw in the previous step.
- Built-in spam and fraud protection. With reCAPTCHA v2 and v3 options available, you’re always in control of how much friction your users face.
- Premium features that scale. As your site grows, you can take advantage of advanced options; otherwise, you can always start with the free plan.
In a nutshell, WP EasyPay is a powerful tool to manage secure payments with ease. By adding CAPTCHA through this plugin, you keep your site protected without sacrificing user experience.
Also Read: 7 Best Payment Gateways for Fast Online Transactions
Final Words
Adding CAPTCHA to a WordPress payment form protects your business from bots. With bots accounting for a significant portion of internet traffic today, it is crucial to maintain site security without compromising the experience for real users.
Using WP EasyPay, you can add CAPTCHA in just a few steps, without touching a single line of code. It keeps spam, fake orders, and card testing attempts at bay, allowing your customers a better checkout experience.
If you run a donation drive, offer online services, or sell digital or physical products, having a safe and clean payment form helps build trust. And trust leads to more conversions.
Try it out. Secure your form. Let the real people in and keep the bots out.
Frequently Asked Questions
How to add CAPTCHA in WordPress forms?
To add reCAPTCHA on WordPress payment forms, install WP EasyPay plugin and then go to Google reCAPTCHA and register a new site by adding the necessary information. Google will create a site and a secret key for your domain. Copy these necessary keys and paste them on WP EasyPay ⇒ Integrations ⇒ reCAPTCHA.
How to fix CAPTCHA on WordPress?
If your reCAPTCHA is not working, here’s what you can do:
Clear cache: Clean your browser’s cache or try using another browser.
Verify reCAPTCHA key placement: Ensure keys are correctly placed in respective boxes; if the secret key is pasted in the site key, or vice versa, the reCAPTCHA will not work.
Verify reCAPTCHA key: reCAPTCHA keys are a combination of random words and numbers. In the event of an accidental tap, you may have added or deleted a letter or number, altering the original key and causing the problem.
Check for conflicting themes and plugins: Sometimes, themes and plugins may conflict with the plugin you use for adding reCAPTCHA. Disable or dispose of these plugins and try again.
Update your system: An outdated system is prone to errors and vulnerabilities. Ensure your system is updated.
Is reCAPTCHA free for WordPress?
ReCAPTCHA is a free service until you have fewer than 10,000 assessments per month. If you have additional requests, you will need to opt for the premium options.
